0

How do you find the best agency to make your marketing project come to life? Finding the best agency can be daunting with so many choices available.

However, by knowing how to write a marketing RFP, you’ll be able to streamline the process and feel confident in your decision. Learn our top RFP best practices, so you know you’re putting your best work forward and get the best in return.

What is an RFP in Marketing?

Let’s start from the beginning.

An RFP stands for Request for Proposal, and it’s a document that your organization will put together when you’re looking for a service that you can’t provide internally or need additional assistance with.

Specifically, if we’re looking at an RFP for marketing services, it would be a document that highlights specific goals your company wants to achieve, such as increasing sales, improving outreach, or support with a specific marketing channel. Then you’ll have the ability to send this document to any vendor you’re interested in getting more information from, whether it’s an agency or a freelancer.

You might’ve heard about RFIs or RFQs during your RFP research. While all three have some similarities, there are major differences between an RFP, an RFI, and an RFQ.

What are the Benefits of Writing an Effective Marketing RFP?

Creating an effective RFP might take some initial time and effort upfront, but this work will help save you time and money throughout your project.

1. Find the Most Qualified Companies

By being intentional about who you send your RFP to, you’ll create a sense of competitiveness and urgency within that vendor list. The vendors want to be the best option for you, so they’re going to put their best strategy forward.

If your RFP is well-organized and your goals and objectives are clear, you’re going to get high-quality responses in return. So you can feel confident that you’re going to find a vendor that provides the finest service and is best suited for your project.

2. Easily Compare Vendors

A key benefit of sending out an RFP is that you’ll have the same information from all of your vendors. This allows you to have an apples-to-apples comparison. You can see the same services and how the price, expertise of the team, and timelines vary from vendor to vendor.

All your vendors answer the same questions. So, rather than going back and forth with emails or searching for answers on their websites, you’ll have everything right in front of you.

3. Discover New Solutions

When you issue an RFP, you might anticipate a certain strategic approach. However, the responses will likely reveal a diverse range of solutions, not just one. This can uncover more thorough and sustainable methods for tackling the project than you may have initially considered.

4. Save Time for Future Projects

As we mentioned before, writing an effective RFP takes some upfront time and effort. But the research you put in now to find these qualified vendors can be used for future projects. A company might not be the right fit for your current project, but if you like what they submitted, then you can consider them for other projects.

a woman sitting at a desk and writing in a note pad.

What to Include in Your RFP For Marketing Services

Striking a balance is important when you’re writing an RFP for marketing services. You need to provide vendors with enough specific information about your needs without distracting them with information they can easily find on your website.

In general, here are a few standardized items you should include according to our RFP best practices.

  • Company & Project Overview: Briefly introduce your organization, its mission, and the specific purpose of the RFP. Clearly state your project goals, objectives, and the problem you want to solve. Define the project’s scope, deliverables, and desired outcomes with clear success metrics. 
  • Timeline & Budget: Provide a project timeline with key dates stated for RFP release, question deadlines, proposal submissions, and anticipated project start/completion. Also include a budget range and specify your preferred pricing structure (for example, hourly, monthly, or quarterly) if you have one.
  • Proposal Requirements: Clearly outline the proposal format and what it should contain. This includes company profiles, relevant experience, team structure, proposed methodology, and client references.
  • Evaluation Criteria: Explain how proposals will be evaluated, and briefly describe your selection process.

By including these, you’ll create an RFP that clearly states your needs and what’s expected of an outside vendor. Since different industries have different metrics, research a variety of marketing RFP examples to gain insights about what to include in your RFP document.

Choosing the Right Vendors for Your RFP

After you’ve completed your RFP, the next step is sending it to potential vendors. It can be overwhelming to find the right candidates to make sure you’re getting the most qualified vendor.

Our best recommendation is to do your research beforehand. Create a short list of options that align with your company’s goals, mission, and values. We recommend sending your RFP to 3 to 5 vendors.

Here are some questions to ask yourself as you’re researching your vendors.

  1. How far away is the agency? Am I okay with working virtually with them? 
  2. Do the services they offer align with my project needs?
  3. Do they have good reviews on Google and social media?
  4. Have they completed similar projects to what I’m asking for?
  5. Do their professional values align with ours?

If you send your RFP to too many vendors, it becomes overwhelming and complicated to make a decision, so you should limit your list to five. It’s to make sure you’re only sending the RFP to companies you believe would be a great fit to work with.

How to Navigate the Marketing RFP Selection Process

Once you’ve written an effective RFP for marketing services and you’ve received a list of vendors, now it’s time for the selection process. There are specific criteria you should be looking for as you’re reviewing the vendors.

The criteria vary based on the purpose and the goals of the RFP. However, a general rule is to look at the vendor’s reputation, pricing, timeline, and communication style.

In some cases, you’re going to be working with this vendor for a significant chunk of time, so although price is important, you should also be looking at the quality of work, testimonials, and their values. You’ll want to learn what others’ experiences working with the company were like.

By getting a full picture of what it would be like to work with the vendor, you can better understand their credibility and authority within the industry. You’ll have a real-world perspective and prediction of the working relationship moving forward.

What’s the Average RFP Selection Timeline?

The exact timeline of your selection process depends on when you’re sending out the RFPs, and your capacity at the time. For example, if you’re sending an RFP out right before the end of the year, your timeline will likely be a little longer due to the holidays. 

As a general rule of thumb, we recommend keeping the process, from start to finish, within a five-week timeline. That way, it’s not drawn out, additional questions don’t arise, and you can get your project up and running efficiently.

Here are the most widely used steps of an RFP process:

  • Week 1: Send out your RFP to 3 to 5 vendors. 
  • Week 2: Review questions from vendors and conduct initial meetings.
  • Week 3: Vendors send their final proposals to you. 
  • Week 4: Pick your final vendors and call their references.
  • Week 5: Meet internally and decide on what vendor to choose.

Questions to Ask in the Marketing RFP Process

By week 2, you’ll be answering vendor questions and then scheduling initial meetings with them. Asking the right questions during the selection process is vital since this is your opportunity to learn more about them and their experience. This isn’t just about vetting—this is about finding a collaborative partner.

Below are a few key questions to ask to help you during the interview process.

  • Who will my contact person be?
  • Where are you located?
  • How long have you been in business?
  • How many clients do you currently have? 
  • How many projects have you completed of a similar nature to mine? 
  • How many employees do you have?
  • Do you outsource your work, or use consultants for any of your projects?

Some Final Best Practices for Marketing RFPs

Now that we’ve reviewed how to write an effective RFP for marketing services, questions to ask during the selection process, and a recommended timeline, we’ll provide you with some final RFP best practices.

1. Make Sure You’re Ready for the Project.

Before you take the time to send out the RFP and get information from vendors, make sure your organization is ready to take on the project. Ask your leadership and project managers questions to ensure they can handle the workload and that a budget is approved.

2. Be Specific About Your Project’s Wants and Needs.

Clear communication is key throughout the entire RFP process. To avoid any confusion, be clear and specific in your RFP, and anticipate questions your vendors will have so you can include them in your RFP.

3. Make Your RFP Easy to Read and Understand.

Whenever possible, make bulleted lists and include headings so a vendor can easily read through your RFP to find out the most essential information.

4. Your RFP Shouldn’t Replace a One-on-One Meeting.

An RFP is beneficial to streamline the selection process, but it shouldn’t replace an initial meeting with a potential vendor. The one-on-one meeting is crucial to get a full understanding of that vendor and how you could work together.

5. Evaluate Your RFP Responses With a Scaling System.

Your selection criteria will vary, but no matter what, you should create a scaling system so you can equally evaluate all responses. Define what your most important characteristics are as you start to select your vendors, and then rank each vendor for that characteristic.

We recommend using a scoring system to evaluate RFPs. Score the responses you receive on a scale from 1-5 or 1-10. This helps you make more apples-to-apples comparisons so you get the best value for your money.

6. Don’t Make Cost the Main Focus of Your RFP.

Although cost is a valuable factor as you make the decision, it shouldn’t be the main focus. Think of it as a three-legged stool; without equal factors, your project may become unbalanced. Ideally, you should consider the following three characteristics.

  1. Speed. How long will the project take? 
  2. Cost. How much will the project cost?
  3. Quality. Will you be happy with the result?

We follow the good, fast, and cheap method. You’re likely only going to get 2 out of these 3 characteristics. So if you want something fast and cheap, it’s likely not going to be very good.

7. Only Ask for References From Your Top Vendors.

Your vendors are going to be asking clients to be a reference for your RFP. This is a big ask, and it takes time out of a client’s day to have the meeting or phone call. So, as an RFP best practice, we recommend only asking your top vendors for references so your interactions are more valuable.

8. Notify the Vendors Who Didn’t Get the Job.

The vendors work hard to put together a proposal, and that also takes time and effort. As a courtesy, let vendors know when they weren’t chosen so they aren’t left waiting around. 

Now that you’ve learned how to write a marketing RFP, connect with our Business Development team to submit one and find the perfect partner for your next project.


Budgeting in any industry can be overwhelming, let alone if you’re putting together a nonprofit marketing budget. It can start to feel like everything is a priority as you sit down to plan. At the same time, it’s important to go into a new fiscal year being mindful of your spend. As you sit down to plan your overall finances for the year, setting up a nonprofit marketing budget is key to achieving the goals and initiatives you’re working towards.

Establishing budgeting goals and marketing objectives doesn’t have to be a daunting task either. When executed properly, they can help you make objective decisions and lay out steps for future success. We’ll cover the importance of creating a strategic nonprofit marketing budget, tips for getting started, and ideas for managing your budget throughout your fiscal year.

Why Is A Nonprofit Marketing Budget Important?

So why exactly is a budget important for your nonprofit, specifically when it comes to your marketing? From a high-level view, it’s key to pre-plan your marketing initiatives and make sure you have the right resources behind them.

If you’re curious what the average marketing budget nonprofits have in place is, research shows the average marketing budget for a nonprofit is 5-15% of your operating budget. However, one surprising study found that almost 20% of nonprofits had no firm budget and simply played it by ear, month to month.

As a nonprofit group, you likely put a lot of energy into impact initiatives like fundraising, donor relations, or event planning. But at the end of the day, marketing is an important piece to all of those activities.

By establishing budgeting goals up front, it’s a lot easier to advocate for the day-to-day support you’ll need before you’re in the midst of marketing work. Plus, when it comes time to review the year with your board, it makes reporting on your marketing strategy’s ROI much easier to track.

6 Best Practices When Creating a Budget for Nonprofits

You should start establishing your nonprofit marketing budget roughly 2 ½ to 3 months ahead of your new fiscal year. The average marketing budget for nonprofit organizations needs to account for cash flow, programs, advertising, and more.

Starting early will give you enough time to set up deadlines for internal and board approvals so you’re ready to get started when the fiscal year begins. Plus, it allows you to engage any outside vendors or marketing agencies that can offer extra outside support.

If you’re not sure where to begin, here are some great nonprofit budgeting tools from the National Council of Nonprofits and some best practices you can use as you’re putting it all together.

1. Set Your Strategy

To start, you’ll need to know the overarching objectives of your organization for the year. Marketing for brand awareness is great, but it’s not the only way you can use marketing to your advantage. Your marketing choices should be flexible enough to offer support in a variety of ways to different impact initiatives.

For example, marketing campaigns to help raise a specific donation amount vs. hosting an event to engage current volunteers look very different. Work with those top nonprofit-wide initiatives and then research how marketing will play a role in achieving them.

2. Determine Your Marketing Goals

Next, shifting our focus to defining nonprofit marketing goals, it’s time to establish specific goals that’ll directly support the broader organizational objectives you’ve identified through your research. These should be clear and measurable, and can include:

  • Gain new members or donors
  • Raise awareness of your mission
  • Broaden your volunteer network
  • Increased donations or support
  • Driving qualified website traffic

As an example of how it all fits, consider a nonprofit that wants to find new volunteers. If there’s a sign-up form on the website, a marketing goal could be to drive more qualified website traffic to that landing page/form.

Increasing site traffic with visitors who have similar interests will give the organization greater visibility and help boost those volunteer numbers over time. Plus, as your site traffic grows over time, you’re likely to build your expertise, experience, authority, and trust (EEAT). This means you’ll perform better in search algorithms as well.

Another way to determine your marketing goals is to use the SMART Framework. This is a simple approach to creating achievable goals.

  • Specific: Be clear about what you want to achieve
  • Measurable: Set metrics and criteria to track progress and evaluate performance
  • Actionable: Set goals that are realistic with the available resources
  • Relevant: Set goals that align with your broader business objectives
  • Time-bound: Establish clear time frames and deadlines to check progress

Once your goals are established, it’s time to consider the specific marketing actions you can take to reach them.

3. Understand Your Nonprofit Target Audience

Understanding your nonprofit target audience and how they prefer to communicate, as well as where they spend their time online and offline, is an important part of your marketing strategy. Selecting the right marketing channels for nonprofits to effectively connect with your target audience is the first step. This will prevent you from wasting resources on platforms where your audience isn’t present.

For example, knowing that 32% of donors are most likely to give via social media, followed by email at 30% can help you budget more money towards social media than print ads.

To maximize your reach and engagement, you should diversify your marketing channel mix by using a variety of platforms. This lets you connect with a broader spectrum of potential supporters.

Also, tailoring your messaging to each platform is key. Using the right messaging on the right channel makes sure that you’re not only seen but also heard and acted upon by your audience.

4. Pick Your Tactics & Plan Ahead

Keeping with our analogy, if your marketing goal is to drive more traffic your tactics may include investing in a PPC campaign or focusing on a content marketing strategy to help you work towards those goals.

And while you’re planning out your tactics, make sure that you’re including a good mix of both traditional and digital marketing efforts.

Some traditional marketing tactics to consider are: 

  • Print advertising
  • Direct mail campaigns
  • Radio messaging
  • Billboard messaging

And some effective digital marketing tactics you can pair with these include:

  • Social media advertising
  • Internet radio messaging
  • PPC / display advertising
  • Organic internet marketing
  • Website redesign or hosting and management updates

From there, decide how to allocate your budget, keeping those main goals in mind as well as any spending requirements. For example, there may be minimum spend amounts needed to do advertising via radio or social media.

If your nonprofit marketing budget also needs to cover events, consider setting up buckets per event. You can include budgeting to cover each event’s postage, signage, security, rental fees, printing, design, and more. That way those hidden costs won’t be unaccounted for in your budget.

As an extra safety net, consider also setting up a miscellaneous fund so you can plan for the unexpected and field any last-second requests. This can also come in handy for items with larger costs like photography, videography, or traditional media placements like TV and radio.

Once you’ve settled on which tactics are most important to reaching your marketing goals, you can start to craft your best marketing budget

Two teammates work together to develop their non-profit marketing budget and marketing strategy.

5. Communicate with Your Nonprofit Team

Nonprofit marketing typically covers a wide range of mission pillars from event planning, execution, follow-up, and everything in between. The key here is to have your action steps planned ahead so you have enough resources to cover all these demands.

While putting together your nonprofit marketing budget, there may be necessary tactics that require clear communication with the board or fall outside the scope of your team. For example, you might need to redesign your website to improve your branding, but if you don’t have the right dev and design support, that can be a challenge. If this falls outside of your budget, then you’ll need to discuss this with the nonprofit’s top stakeholders.

As you start to outline your marketing budget, communicate what’s needed for your marketing tactics to be successful, and also advocate for the resources your team will need to accomplish them. Establishing expectations at the start will make the months ahead easier to navigate.

6. Evaluate Performance & Measure Your Effectiveness

To get a sense of how well your marketing campaign is performing, it’s important to check your key performance indicators. For each marketing channel and the specific goals associated with them, it’s crucial to track relevant metrics and regularly assess how things are moving.

Tools like Google Analytics 4 (GA4) can be incredibly helpful. Setting up tracking from the beginning allows you to monitor site visitors, important actions (key events), how engaged users are with the content (engagement rate), and more. This provides valuable insights into what’s working and where adjustments are needed.

Managing Your Costs Throughout the Fiscal Year

Once your nonprofit marketing budget is in place, the next hardest part can be sticking to it and managing it throughout the year. Since the average marketing budget for a nonprofit is a small percentage of your budget, it can be easy to go over or use that for a different project. Here are some of our recommendations that can help, especially if you’re trying to maximize your dollars throughout the fiscal year.

Use Your Volunteer Network

It’s easy to think within the confines of what your team can do, but don’t forget there’s an entire community behind you that believes in your cause! Consider ways that organizations, volunteers, or other partners you have exposure to can help open the doors for growth and help you carry out marketing goals in a cost-effective manner.

Volunteers support their local non-profit by spending time packing and organizing boxes.

Look for Trade or Pro-Bono Relationships

Be vigilant for any opportunities to create a mutually beneficial relationship that also helps you stay on budget. This could include:

  • Trading venue fees for sponsorship highlights on event materials.
  • Trading a free, mission-driven in-office lunch and learn for event volunteers.
  • Trading board membership dues and seat for marketing support.

Don’t Just Think in the Present

It can get difficult if your staff gets bogged down with immediate fundraising needs or focuses on the event happening right now, with no preparation for what lies ahead. This short-sighted focus can hinder any necessary preparation for your next significant impact initiative, which could hinder its potential future success.

Most importantly don’t just stay in the moment with your marketing. Always keep an eye a month or two ahead, even while you’re evaluating the past months, to make any nonprofit marketing budget adjustments and stay on track.

How An Agency Can Make The Most of Your Money

As you begin establishing your goals and marketing budget, remember that you are not alone. If you’re finding that there are certain marketing goals that fall outside what your team’s expertise or you need help creating a well-rounded marketing plan, having an outside perspective can help.

Working with an agency can generate creative ideas for expanding your mission awareness into new markets at a reasonable cost. Streamlining your outsourced marketing support by working with a single agency can lead to long-term cost savings. It can also create a consistent support system for your marketing efforts.

Hiring a marketing agency can help you find the best strategy based on best practices and a more integrated approach. Instead of spending time and dollars on tactics that don’t work, a marketing agency will develop a strategy to generate results.

Outsourcing some of your marketing needs provides flexibility and access to specialized skills without having to pay full-time salaries or benefits, which can be hard to do at a nonprofit due to budget concerns.

Agencies have access to a variety of tools and other resources that could be expensive for individual businesses to acquire on their own. Using tools, agencies can deliver targeted campaigns quickly and efficiently.

Many nonprofits have trouble developing effective marketing strategies that connect them with their audiences and help them achieve their goals. Working with an outside agency can help you find the correct strategy quicker and not waste time with guesswork.

Plus, an experienced agency can help you when allocating funds for marketing channels you aren’t familiar with. They can help you determine the best spend for your money so you can make the best impact.

Looking for more advice on creating a nonprofit marketing budget? Listen to our podcast for insights from experienced nonprofit marketing professionals.

If you’ve ever Googled something before, you’ve probably noticed how popular brands are ranked higher on your search page. 

You may ask yourself, “Where do I start?” Or, “How can I get users to see my page on top of search results?” 

We’ll guide you through our 10-step keyword research checklist to help answer those questions and create a solid foundation for your SEO content strategy. 

What Is Organic Keyword Research & Why Is It Important?

Organic keyword research is the process of analyzing data on user search queries and determining what phrases are key to use in your content. Doing this helps enhance your site’s Search Engine Optimization (SEO), naturally boosting it higher on search results without paying a cent. 

It’s important because people are constantly searching for words or phrases to find what they’re looking for. That’s essentially your job when doing organic keyword research – to give people the information they’re looking for. 

You can also rank higher on paid search results, but for this blog, our focus is on your organic keyword strategy. 

Benefits Of Organic Keyword Research

  1. Increase Organic Traffic 

Organic keyword research will help you rank higher in the Search Engine Results Pages (SERPs) for relevant keywords. When you rank higher, you’ll likely see an increase in organic traffic to your site. 

  1. Increase Conversion Rate

After an increase in organic traffic, you’ll likely see an increase in conversion rates because your keywords will be specific to your user’s needs. They’ll find what they’re looking for on your site and will be more likely to take an action, such as purchasing your product or service. 

  1. Stay Up-To-Date With User Behavior  

After following our keyword research checklist, you’ll be able to keep up with your target audience’s current search behaviors. By analyzing keywords your users are actively searching for, you’ll gain valuable insights into your audience’s current interests or needs to create effective marketing strategies.

shutterstock 695980678 1 Keyword Research Checklist: 10 Easy Steps to Boost Your SEO

Need a simple summary of our keyword research checklist?

10-Step Keyword Research Checklist

Want to learn how to do keyword research? Follow these 10 steps to build a foundation for your SEO content strategy. 

Step #1: Brainstorm Topics Or “Seed Keywords”

To start your keyword research process, think about your business goals. You understand your business the best, so make a list of potential topics to target. 

Seed keywords are broad topics related to your business. Put together a list of words or phrases you think users will search to find your website.  

How To Start Brainstorming Seed Keywords: 

  • Use Google SERP features by typing in one of your seed keywords. You’ll see what ranks high or low based on your search term. 

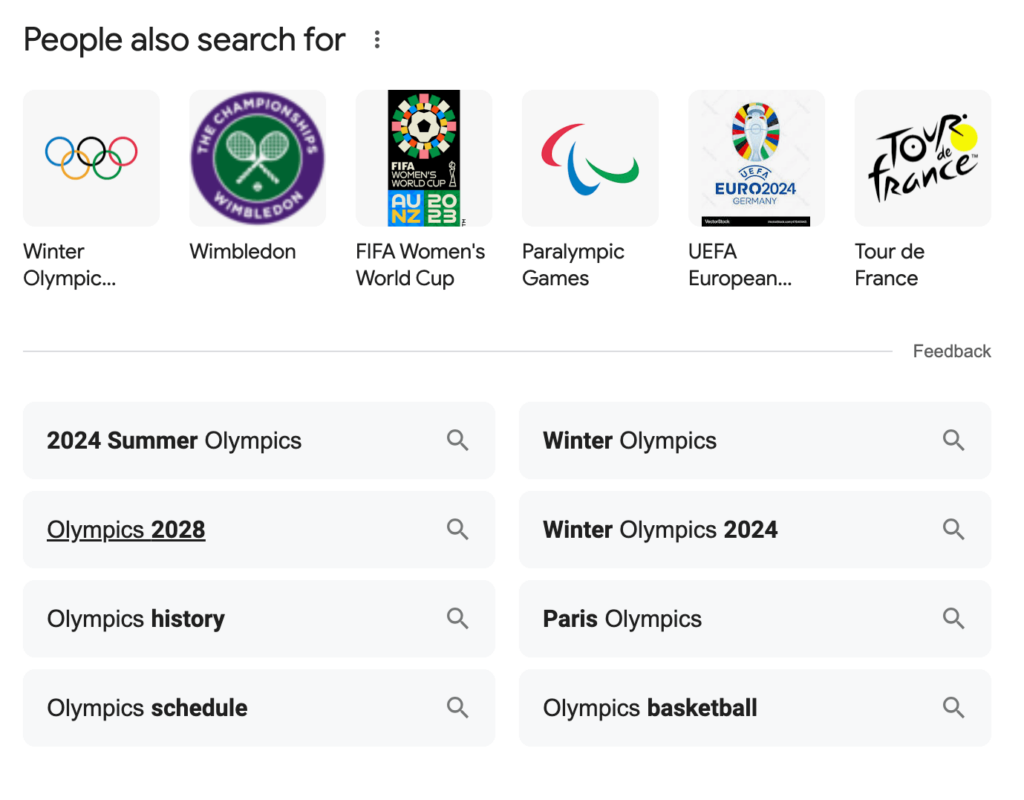
You can also scroll down to the bottom of the search page to see what “People also search for…” 

Google Search Engine Results Page feature showing what people also search for when searching Olympics
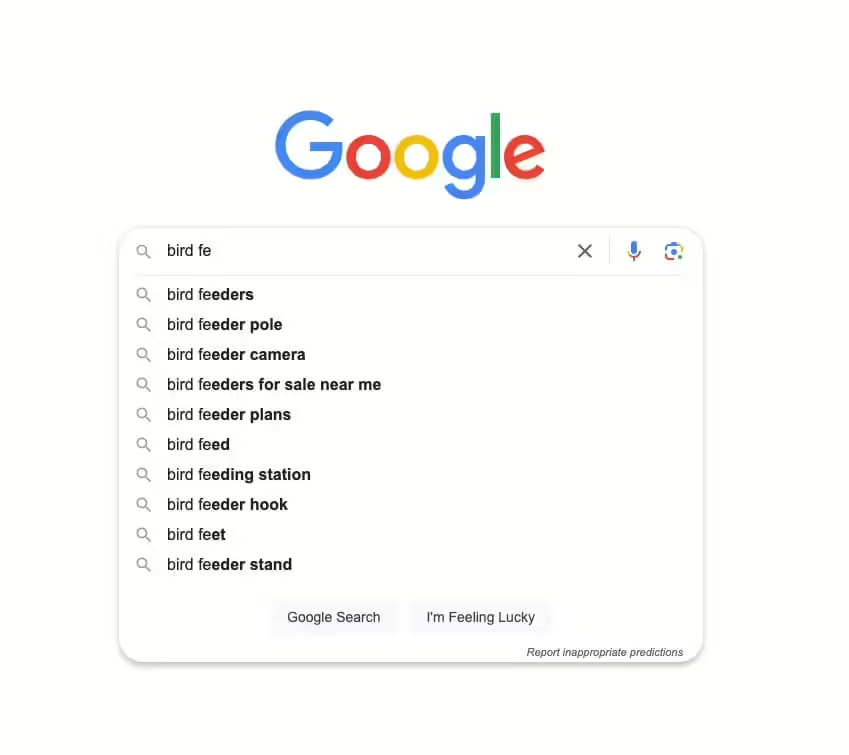
  • Google Autocomplete shows you what users are searching based on the word or phrase you’re using.
Google Autocomplete showing what people might search when looking for bird feeders
  • Browse your seed keywords in an incognito window. 

We do not recommend relying on ChatGPT to give you a finalized set of keywords because it can give you misinformation. It also limits you on keyword relevance because AI can’t give you search volume. Use ChatGPT as a guide to help brainstorm ideas, and remember to fact-check answers. 

Brainstorming is the starting point – keep following our keyword research checklist to reach the finish line. 

Step #2: Understand Keyword Intent

After brainstorming topics to rank you higher on SERPs, it’s time to understand your user’s keyword intent. 

Keyword intent helps you know where your user is in their decision-making process. Determine the purpose behind your user’s search using the 4 different types of keyword intent.

  1. Informational 
  2. Navigational
  3. Commercial
  4. Transactional

You can narrow this down by further understanding the different marketing funnel stages. Are they showing awareness, consideration, conversion, loyalty, or advocacy? 

Ask yourself “Who exactly am I writing to, and why are they searching for x, y, z…?”

Understanding your user’s keyword intent helps you target keywords to meet their needs and improve your website visibility. 

Step #3: Use Long-Tail Keywords 

Long-tail keywords are specific phrases or questions targeting more unique and detailed searches. 

They have less volume and less competition because they’re more precise and less commonly searched. This makes visitors searching for these terms more likely to make conversions because they’re interested in what you have to offer. 

Once you know your user’s keyword intent, prepare a list of long-tail keywords they might search to find an answer. 

Step #4: Understand What Search Engines Are Ranking 

Google ranks websites based on relevance, authority, and volume. There are also some other ranking factors to take into consideration. 

Your keywords and phrases must be relevant to your business, but most importantly to your target audience. Focus on what the user wants, not the search engine. Use keyword intent to impress Google with relevant content. 

Use internal and external links to boost your topical authority and expertise. Have your external links going to reputable sources, and create concise content that’s easy to read. 

Focus on the search volume for keywords you want to use in your content. Knowing the volume for keywords helps you gauge the relevance and demand for your topic. 

Person looking at marketing metrics on a computer

Step #5: Take Note Of The Metrics For Each Keyword Or Phrase

Now we must measure the metrics for Google ranking factors. 

Focus On Monthly Search Volume (MSV) And Keyword Difficulty. 

MSV is the average number of searches per month. Keyword difficulty shows how competitive it is to rank for a specific keyword or phrase. 

Websites like Nike and Apple rank higher on SERPs because their brand is well-known to users and Google. Their topical authority is strong, and they most likely use keywords with high volumes and higher difficulty percentages. 

If you know your topical authority isn’t as strong as Nike’s or Apple’s, prioritize long-tail keywords. 

*General rule: choose keywords with a high volume and low difficulty. 

Step #6: Compare With Competitor Keyword Research

Find what your competitors are ranking for with competitor keyword research. Search for terms you want to use in your content and compare them with current keywords competitors are using. This will help you compete for keywords and identify keyword gaps

Step #7: Finalize Your Keyword List 

After completing steps #1-6 of our keyword research checklist, you’ll have a strong list of keywords and phrases to use in your content. 

Tips to finalize your keyword list:

  • Have 1 primary keyword with high volume and low competition.
  • Have a longer list of secondary keywords to use throughout your content.

Secondary keywords must be relevant to your primary keyword and should help you create sections within your content. They can have higher difficulty percentages since your focus is ranking for your primary keyword. 

Step #8: Incorporate Keywords Into Your Website 

Want to learn how to incorporate your list of keywords and phrases into your website? Use strategies like keyword clustering and writing for featured snippets. 

Keyword Clustering 

Cluster your keywords by grouping them together into similar categories. Your primary keyword is the main topic you want to rank for, while secondary keywords are meant to complement and enhance your primary. 

For example, if your primary keyword is “home workouts,” secondary keywords might be “cardio workouts at home” or “work out equipment for home.” You can take those keywords and organize them into clusters to build your content and rank for multiple search terms at once. 

Avoid Keyword Cannibalization 

Although keyword clustering is beneficial, you want to avoid keyword cannibalization. 

Keyword cannibalization is when multiple pages on a website target the same keywords. This confuses search engines because they won’t know which page to show in SERPs, leading to reduced rankings. To avoid this, create unique and individualized pages with separate keywords.

Write For Featured Snippets

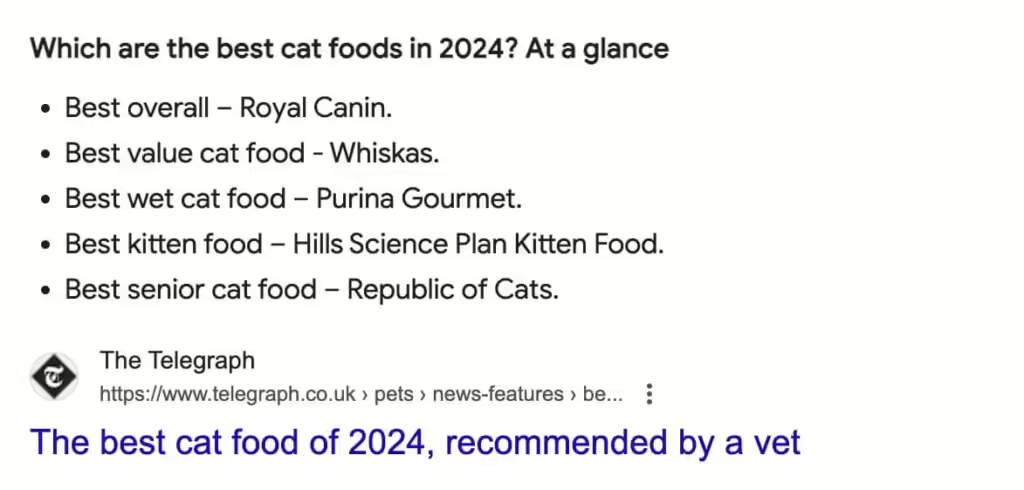
A featured snippet is another Google SERP feature used to boost ranking. For a chance to have Google highlight your page as a featured snippet, include simple bullet points, numbered lists, short concise paragraphs, and of course, your primary keyword.

Featured snippet giving users a bulleted list for the best cat foods in 2024

Step #9: Use Free Keyword Research Tools 

Resources are available to help complete your keyword research checklist. Many of these have both free and paid plans.

Step #10: Track Your Positioning 

After publishing your website page, we recommend tracking your progress to see any changes in current marketing trends. 

Ask yourself:

  • Are your keywords still effective? 
  • Are they relevant? 
  • Are they still ranking high on SERPs?
  • Do they enable you to show up for any SERP features?

Tracking allows you to improve future SEO efforts. We recommend using Google Search Console to monitor this.

Need help using our keyword research checklist to master your SEO content strategy?


Where’s your cell phone right now? It’s probably within an arm’s reach, definitely close enough to hear the ping of a new text message. 

Across the globe, over 6 billion text messages are sent daily. If you work in digital marketing, you can use this to your advantage. 

Think about how often you pick up your phone a day. Now think about the visibility your messages could have if you can reach people through text.

If you’re looking for an effective customer retention strategy to keep your audience engaged, text marketing can be a powerful channel to invest in. From best practices to tips on growing your contact list, explore how SMS marketing campaigns can transform your business.

SMS Marketing: The Basics

Short message service, or SMS, marketing is a form of mobile marketing that uses text message campaigns to send information to a consumer’s cell phone. This could include anything from discounts and order confirmations to business updates and customer feedback surveys.

Much like email marketing, SMS messages are managed in a CRM where texts can be sent manually or in bulk. Unlike emails, however, SMS marketing campaigns are simpler, more concise, and more likely to be opened.

Text campaigns have a nearly perfect open rate of 98%. Of those opens, 97% happen within the first 15 minutes of delivery; 90% in the first 3. No other distribution channel comes close to an open rate this high.

Bottom line: it’s one of the most powerful digital marketing tools because it puts businesses in direct contact with customers on a channel that’s proven to capture attention. 

Types of Campaigns

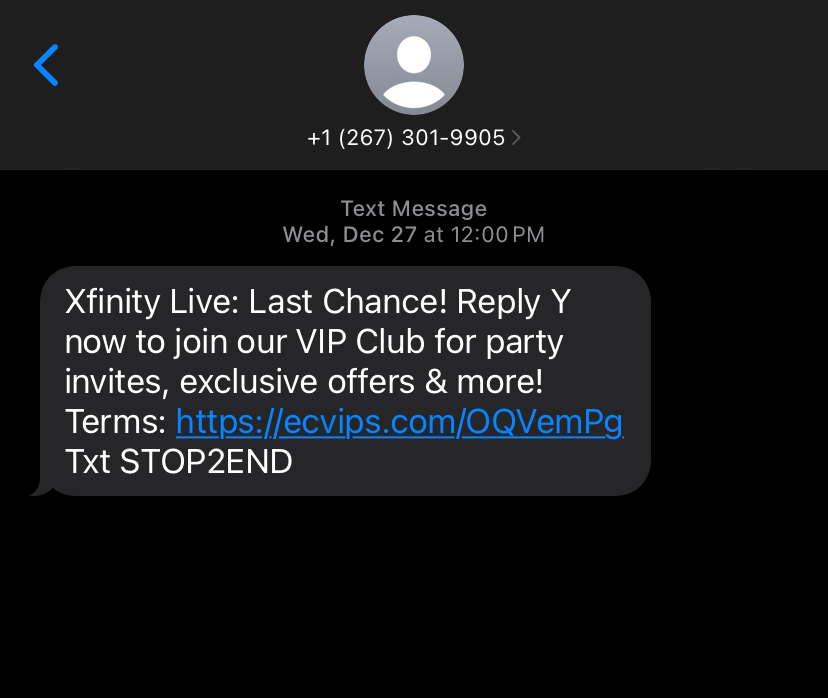
SMS marketing campaign messages usually fall into 1 of 2 categories: promotional or transactional. Let’s take a look at how they’re used. 

A screenshot of a text message from Xfinity Live, asking to join their VIP Club.

1. Promotional

Anything that pushes the sale of a product or service — discounts, coupon codes, limited-time offers — is categorized as a promotional message. These have a clear marketing intent: user engagement. 

Whether it’s to make a purchase, fill out a survey, or opt-in to a loyalty program, promotional messages are sent with conversions in mind. 

Some examples of promotional text message campaigns might include:

  • Coupons 
  • Flash sales
  • Sweepstakes
  • New product announcements
  • Event promotions
  • Loyalty program invitations
  • Early access deals

Overall, promotional campaigns help keep your business top of mind and are popular for driving engagement with new and repeat customers. 

Promotional SMS Marketing Compliance

Just like email marketing, the Telephone Consumer Protection Act (TCPA) lays out clear opt-in and opt-out requirements for text message campaigns. Sending unsolicited promotional messages without permission is illegal and punishable by some hefty fines

To stay compliant, businesses must obtain explicit consent from users before any communications are sent.

From a marketing standpoint, sending messages without permission could be detrimental to your brand reputation as well. Text inboxes are perceived as more personal than email inboxes. Sending a text to your customers without an invitation is an invasion of privacy and could cause them to think about your brand differently. 

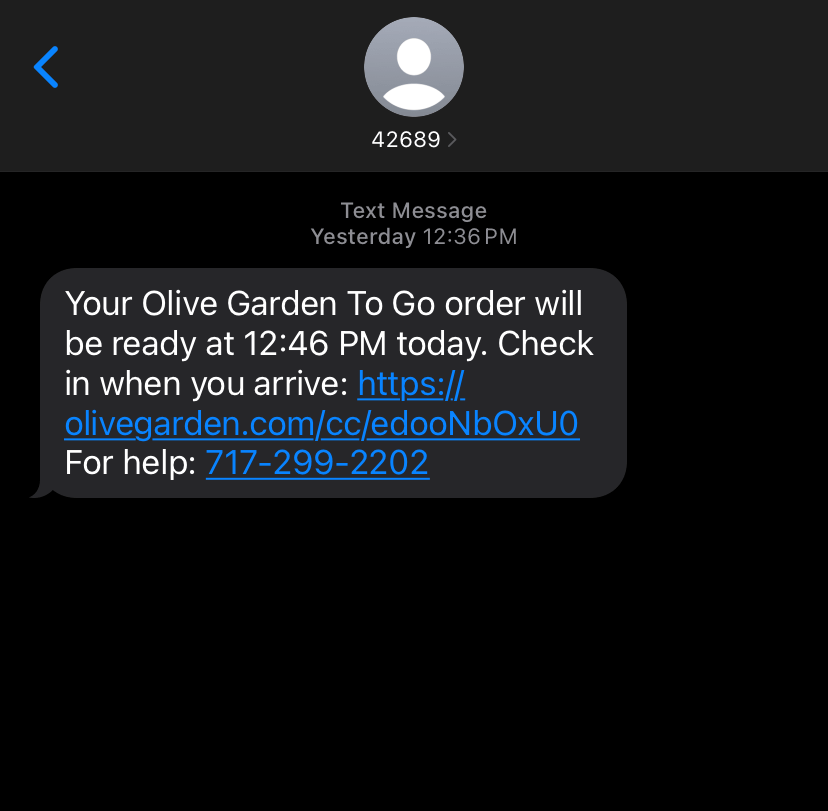
A screenshot of a text from Olive Garden saying your to go order will be ready later today.

2. Transactional

Transactional SMS marketing campaigns happen after the purchase or desired action is taken. They are often automated, and sent in response to an action being taken

Some common examples of transactional messages could include:

  • Order/booking confirmations
  • Shipping & delivery updates
  • Billing information
  • Appointment reminders/confirmations/cancellations 
  • 2-factor authentication (2FA) or verification codes

They differ from promotional SMS marketing campaigns because their marketing intent is simply customer care. The message content delivers essential information to support the customer’s journey with your brand

For this reason, they are a valuable customer service tool that can help boost customer satisfaction and trust. 

Transactional SMS Marketing Compliance

Unlike promotional SMS text regulations, transactional compliances are a bit more flexible because they’re seen as an expectation. Consent can sometimes be implied because communications provide convenient updates for recipients about their orders.

As a best practice, however, it’s still highly encouraged to obtain expressed consent. It shows your customers that you value their privacy and boundaries, and it protects your business from any possible legal infringements.  

Benefits of SMS Marketing Campaigns

Now that you have a better idea of what text campaigns are and how they can be used, let’s take a look at why you should use them. 

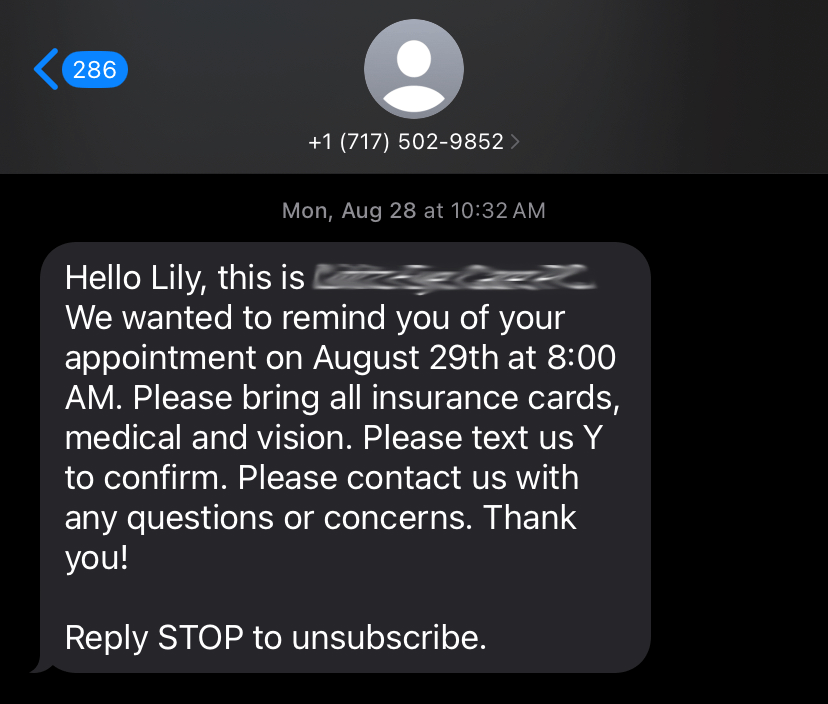
A screenshot of a text from a doctor reminding Lily of her upcoming appointment. The name of the business is blurred out.
  • Allows for personalization: The key to any effective marketing campaign is personalization. Consumers love a message or deal that’s tailored to their interests, and at this point, it’s an expectation. Adobe reports that 76% of users are “frustrated” when brands don’t personalize their messaging.
  • Builds loyalty: Through personalization and respecting communication preferences, text campaigns can make your customers feel valued. The more important they feel, the greater the chances they’ll become a repeat customer. 
  • Supports other channels: On its own, SMS campaign performance is strong. But it can also be used to boost your performance on other digital channels, too. You could run a promotional SMS marketing campaign to get users to subscribe to your email list or to follow your social media accounts. 
  • Easy to create: Character counts and other content constraints make SMS messages easy to produce. They must be short and to the point, which can save time and get time-sensitive messages to your contacts faster.  
  • Accessible for any industry: Whether you work in retail, finance, tourism, or healthcare, text campaigns can support communications in any B2B or B2C industry. 

Disadvantages of SMS Marketing Campaigns

Though the list of advantages is long, there are a few drawbacks to also consider.

  • Permission-based: Explicit consent is required to send text campaigns. If you’re building your contact list from scratch, finding customers to opt-in can be a challenge. 

But don’t let this stop you — according to an Attentive Mobile Consumer Report, over 91% of survey respondents expressed interest in receiving SMS marketing campaigns from businesses. 

  • Message limitations: Most CRMs have text limitations in place, which can complicate the delivery of certain messages via SMS. Standard plans require texts to contain 160 characters or less. Anything exceeding that limit will be sent in a string of 2 messages and will cost 2 SMS credits. 

Character limits are even more restrictive if your text contains Unicode. Messages with Unicode must be kept to 70 characters or less. (Emojis are considered Unicode and are counted as 2 characters, so craft your messages wisely!)

SMS Marketing Strategies

After you’ve decided to add SMS to your business toolkit, it’s time to perfect your strategy. Below, we’ve outlined some best practices to follow when it comes to building lists and improving engagement.

Building Your Contact List

Building your contact list starts with awareness. Your target audience must know that you have a text message option available. In that same vein, it’s also a best practice to let them know how you intend to use their number. 

Any additional information you can provide about the type of messaging and the frequency of messaging could be a determining factor in getting users to join your list. Transparency = trust = conversions.

So how do you get users to join your list? There are plenty of strategies your business can try.

  • Text-to-join: The most basic, but tried and true method for getting users to join your SMS contact list. It requires users to text a keyword to your SMS short code or 10-digit number to opt-in 
  • Sign-up forms: Get users to sign up using a form. Try embedding forms on your homepage, site footer, or in blog content. 
  • Use your email list: If you already send newsletters to an email list, use that to your advantage by encouraging them to sign up and stay connected via SMS. (Note: Even if they consented to receive email communications, it cannot be assumed they want to receive text campaigns, too. Consent is still required!) 
  • Checkout opt-ins: If you have an eCommerce site, ask users for their phone number during checkout. Add a check box near the number entry for users to check yes or no to consent to receive SMS communications. 
  • Incentives/exclusive discounts: With a little extra incentive, like offering opt-in discounts or running deals for only your SMS contact list, more users are likely to sign up. 
  • Promoting on other channels: Raise awareness for your SMS program by promoting it on social media. For the best results, try running a paid ad on your preferred social media platform. If you don’t have the extra budget, promoting it organically will work just fine. 

Best Times to Send

Like your email marketing strategy, the success of text marketing campaigns relies heavily on being sent at the right time. Textedly suggests limiting send times to regular business hours for promotional SMS campaigns. Transactional, on the other hand, can be sent at any time since they’re typically sent by an automation triggered by a user action. 

Audience Segmentation

If you’re looking for additional ways to optimize your SMS campaigns, audience segmentation can be crucial. Segmentation is the process of categorizing your target audience into additional smaller subgroups based on interests, behaviors, or other criteria. 

To get started, here are some basic ways to categorize your contact lists:

  • Engaged/unengaged users
  • First-time/repeat purchases
  • Location/time zones

You can use these categorizations to help improve your personalization strategy. If you know how they’ve engaged with your SMS marketing campaigns in the past, you can send personalized offers based on what you know they’re most interested in. 

Drive Results with an Integrated SMS Marketing Strategy

SMS is proven to be a highly effective tool for driving results, especially when integrated to assist your existing marketing efforts. If you want to boost your brand visibility and meet your users where they are most active, it’s time to tap into SMS marketing. 

Explore how your business can benefit from text marketing. Contact our team of specialists to start seeing results.

The average person spends 152 minutes on social media daily. That’s 2 hours and 32 minutes of consuming content on any given day. 

And if your business is lacking an effective social media optimization strategy, that’s over two and a half hours you could be missing out on to nurture customer relationships. 

Social media optimization (SMO) — not to be confused with search engine optimization (SEO) — is essential to your business’s organic social media strategy. If your account isn’t designed to be discoverable and shareable, the odds of new users finding your account are left merely to chance.  

Luckily, there are some fool-proof steps that you can take to boost those odds. Unlock the secrets to expanding your messaging, strengthening your credibility, and nurturing customer relationships through SMO. 

What is Social Media Optimization (SMO)?

You’ve heard of word-of-mouth advertising. When it’s done right, it can be an extremely powerful and free marketing tool. Think of SMO as the digital version of word-of-mouth advertising. 

Put simply, SMO is the process of refining your organic social media accounts to increase your brand’s reach and visibility across various platforms. 

It goes beyond the basics of simply existing on a social platform. It’s deeply understanding your target audience and crafting valuable content for them to engage with and share on the platforms they are most likely to be on. 

To help better explain the concept, let’s clarify what SMO is not

SMO vs. SEO

Though SEO and SMO have similar intentions, they are two different marketing tools. SEO is the strategic process of maintaining site health through technical improvements and writing content to boost website visibility in search engine result pages (SERPs). 

In the same way that SEO keywords help users find your site in the SERPs, SMO helps users find and engage with your business on social media

They are both long-term strategies intended to drive traffic organically to their respective channels. 

SMO vs. SMM

Unlike SMO or SEO, social media marketing (SMM) is usually a paid social media effort with a pointed objective. The goal of SMM is to drive web traffic, generate leads, or raise brand awareness to a targeted audience through paid social marketing channels.

You’ve probably seen SMM hard at work on your own social media feeds. Because businesses are paying to reach their desired audience, SMM is almost impossible to avoid. You’ll know it’s a paid effort because it’s labeled as “sponsored content”.

SMO on the other hand, will always be discovered organically because it’s a free marketing strategy. 

8 Benefits of SMO

Optimizing your social media accounts can benefit your business in many ways. Aside from boosting your brand awareness, SMO can help your business:

  1. Reveal a personal side by participating in online conversations with your audience.
  2. Acquire intelligence by listening to customers and observing competitors.
  3. Establish trust and credibility by solidifying your online reputation.
  4. Increase the influence, shareability, and linkability of your content— a great way to work in tandem with SEO! 
  5. Establish your business as a trustworthy, authoritative resource.
  6. Identify valuable users who can act as potential brand ambassadors.
  7. Analyze your target audience and how they associate with your brand.
  8. Find, learn about, and create compelling content that may be overlooked by Google.

If those benefits sound desirable to your business, stick with us to learn how to achieve them.

SMO Strategies

When it comes to putting SMO into practice, there are on-page and off-page optimizations that are recommended to boost your brand’s awareness. Therefore, a comprehensive SMO strategy is two-fold: it requires optimizing your social media accounts and your website. 

Social Media “Off-Page” Optimizations.

With “social media” in its name, you’ve probably made the connection that SMO requires work on your social media accounts. There are so many things to optimize for on your social media sites that it helps to split the off-page SMO strategies into 4 buckets:

  1. Profile Optimizations
  2. Content Optimizations
  3. Post Engagement Optimizations
  4. Community Building

1. Profile Optimizations

Profile optimizations refer to refining your social accounts to accurately describe your business. This includes ensuring all business information — name, address, phone number, and site URL — is up-to-date and the same across all platforms. 

It also includes crafting an engaging bio or “about” section on the platform to help your account get found in search. Your bio should answer the following basic questions:

  • Who you are
  • What you do
  • Where you’re located 
  • How to reach you

If your company is already utilizing an SEO strategy for your website, try to use a primary keyword that you use on your homepage in any of those descriptions. This should help boost your visibility when people search for a related keyword.

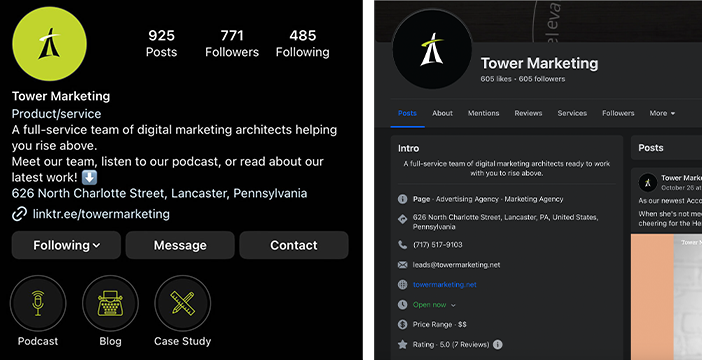
screenshot of Tower Marketing's Instagram and Facebook profiles

In this example, you can see that Tower Marketing uses consistent keywords, such as “full-service team” and “digital marketing,” to describe who we are and what we do. The address indicates where we are located, and our contact information makes it easy to reach out.  

2. Content Optimizations

Content optimizations are related to the nature of the content you’re posting on your accounts. Are you posting topics that your intended audience is interested in? Do the graphics fit your messaging and reinforce your brand voice?

Understanding the desires of your target audience is incredibly important to your SMO strategy. If users aren’t interested in your content, they won’t share it and you won’t actually be expanding your reach. 

After you’ve nailed down the content you should be posting, it’s time to optimize your content for engagement. 

3. Engagement Optimizations

Engagement optimizations refer to the strategies your business can use to boost the performance of your posts. Perhaps the most obvious engagement tool you can use on social media is hashtags.

That’s right, hashtags are still effective in 2023! They help categorize posts into a digital filing system so that when a person uses a social platform as a search engine, all posts using that hashtag are accessible in one place. 

Adding hashtags to your posts can ensure your content is filed in the digital system, increasing the chances of having new users discover your account. Experts recommend using 3-5 hashtags per post

 Aside from hashtags, two of the most important engagement tactics to consider are the frequency and timeliness of posts. 

You’ll need to find the balance between posting regularly to keep your business top of mind without coming across as spammy. Determine the number of posts you’re comfortable with publishing per week or month and stick to it. 

In addition to the volume of posts, the time that you post can directly impact engagement. If you’re posting on a day of the week or at a time when your audience is least likely to be active on social media, the post’s engagement will likely suffer. 

Using industry research is a good place to start, but don’t be afraid to fine-tune your strategy based on the analytics you observe. Take note of high- and low-performing posts and analyze what factors contributed to their success. 

When you can pinpoint what works and what doesn’t, you have a roadmap of dos and don’ts to implement in the future. 

Also, keep in mind that every platform’s user demographic and algorithm is different, so your cross-platform strategy might have to vary slightly, too. 

4. Community Building

Once you’ve done your due diligence to refine your profile, content, and engagement strategies, the final off-site SMO strategy is community building.

Remember, social media is an extension of your business, so the way you present yourself can impact your online reputation. The best way to ensure that your reputation is positive is by actively engaging with your followers.

This can include a plethora of things:

  • Liking and responding to comments/questions promptly. 
  • Responding to direct messages. 
  • Sharing other posts that your audience might be interested in.
  • Creating private groups for followers to engage with you and other like-minded users.

When you engage with your followers by showing interest and empathy, you’re building a reputation of trust. 

In recent years, many social media platforms have introduced features to help with audience engagement. For example, LinkedIn, Facebook, Instagram, Pinterest, and X (formerly Twitter) all have a poll option, which invites users to share their opinions.

a screenshot of Tower Marketing's LinkedIn poll

Here’s another example from Tower Marketing’s LinkedIn account, asking users to share how they help get out of a creative rut. 

When you utilize these features and ask the right questions, you’re showing your audience that you care about hearing from them and not just sharing about yourself — something that can be a powerful tool for maintaining your community.

Website “On-Page” Optimizations

On-page SMO focuses on your website. More specifically, it entails optimizing the shareability of your content to control the way your posts are shown, shared, and displayed when distributed to a third-party site or social media platform. 

Use Sharing Buttons

Making a webpage easy for users to share is a no-brainer. If you don’t already employ social sharing buttons on your website, that is the first on-page optimization you should be implementing. Adding social sharing buttons to your website content makes it simple for users to distribute your content to their networks.

In the same way that you should link to your website on social media, your website should link directly to your social accounts, too. Most businesses do this by nestling buttons in the site footer. 

a screenshot of HubSpot's website footer that shows links to their social media accounts

Here is an example of how HubSpot displays the links to their social media accounts. The icons are subtle but large enough to easily be found. They also communicate to site visitors what platforms they can find your business on. 

Utilizing Rank Math SEO

If you use WordPress as your CMS, the Rank Math SEO plugin is a great way to optimize your pages and posts for social media. Rank Math adds a tag to your website that allows your business to edit how your site content is displayed on social media and/or search engines when shared.

Using Rank Math’s social tab, you can

  • Create a custom title, description, and image.
  • Generate social media images.
  • Customize Facebook or Twitter cards based on your needs.
a screenshot of Rank Math's social optimization tab

Why does this matter? Because when you don’t optimize for SMO, it can look messy. Long headlines or descriptions might be truncated, leaving out important information intended to garner interest. 

Previewing your posts using Rank Math’s social tools tab allows you to adjust your content and ensure the most important information is visible to your audience.

screenshots of Rank Math's SMO tab

Here’s an example of using Rank Math to shorten the blog title and description for the Facebook card. On the left, you can see how the text is cut off because it’s too long. On the right, the description text and the title were both shortened to keep the social display less wordy and to the point.

SMO Tips & Takeaways That You Can Start Implementing Today

I don’t think enough businesses are strategically thinking through the opportunities available when they optimize their website and content for social. Here are some final SMO tips and actionable tactics that your business can start employing today.

Tactical Optimization Tips

  • Focus on what matters most. It’s not about optimizing for everything — it’s about optimizing for what you want to be known for. Write content that is specifically for your audience.
  • Be social. Remember that SMO isn’t about sales. It’s about people and creating relationships and trustworthiness. Connect, interact, and most importantly, be human. Sales will come as a result.
  • Try different calls to action. A good CTA helps increase engagement, so it’s figuring out which CTAs work best for your audience to click through.

Visual Optimization Tips

  • Use the right image dimensions when posting images on different platforms. This maintains an organized feed and ensures no images are cut off or distorted. 
  • Post high-quality images. If you can, posting your own images tends to do better than finding and posting an image from Shutterstock. Authenticity is honesty is trust. 
  • Keep your branding consistent across all of the platforms you’re active on. Don’t confuse your users. Colors, logos, and images should emulate your website.

Topic Optimization Tips

  • Use social media chatbots. Not everyone has time to respond to every user on social media. Social media chatbots are a great way for you to respond to users by programming responses based on frequently asked questions. 
  • Use keywords from organic search and PPC. Including well-known search terms is a simple (but effective) way to optimize your social profile pages.
  • Learn from your competitors. What sort of posts are performing well for them? Who do they interact with the most?

Audience Optimization Tips

  • Know your audience. Use analytics tools that are freely available to create content that you know your audience is interested in.
  • Learn from your community. Ask questions and get firsthand insight from those who engage. Use this information to improve your products/services and business offerings.
  • Look for opportunities to engage. Find people you want to connect with and figure out how to start a conversation with them. Be social.

Conclusion

If you want your website to be found by the right people — the users who matter — SMO is essential to your marketing strategy. Great content can only be great if it’s found. 

Does your business need help implementing on-site or off-site SMO strategies to expand your reach? Our full-service digital marketing team is equipped to help. Reach out to a team member to schedule a consultation. 

This blog was originally published on December 18, 2019, and rewritten on November 3, 2023.

If you work in business, you’ve probably heard the terms “marketing mix” or “the 4Ps of traditional marketing” at one point in time. But with the booming success we’ve seen in the digital marketing industry, have you considered how to integrate those concepts into your internet marketing strategy?

Learn how the digital marketing mix uses the 4Ps —plus 3 additional Ps — to master the nuances of successful online marketing.

 What is the Marketing Mix? The Traditional 4 Ps Explained

If you are asking yourself, “what is the marketing mix,” it is best defined by Phillip Kotler as a “set of marketing tools that the firm uses to pursue its marketing objectives in the target market.

The 4Ps are the foundation of any successful marketing plan. They include:

  • Product
  • Price
  • Place
  • Promotion

For years, the 4Ps have been the go-to model for building a marketing strategy. But, in the era of internet marketing, referring to only the 4 Ps can limit your brand’s reach. 

According to WordStream by LocaliQ, 72% of marketing budgets are reserved for digital channels, increasing digital marketing’s share of advertising to 55%. With that increase, the concepts of product, price, place, and promotion also needed to grow.

The digital marketing mix is an expansion of Kotler’s traditional marketing tools. The 7 Ps of digital marketing include product, price, place, promotion, people, process, and physical evidence. 

The 7 Ps of Marketing

Defining The 7Ps of The Digital Marketing Mix

Let’s jump into defining the digital marketing mix and explaining how using these 7Ps can help you build on your existing approach to better reach your customers. 

1. Product

Product refers to the ‘thing’ you offer that your target audience wants. This can be a physical, tangible item, or an intangible service. From clothing or water bottles to home insurance or a digital marketing agency, a product is the item or service the user seeks to fill a need.

If it helps, think of the product in terms of supply and demand. All consumers have wants and needs. You are in business because you offer something that is wanted or needed by a consumer. Your product supplies that consumer’s demand.

Focus on the Consumer First

A lot of businesses think they have a great product and then try to market it to the public and fail. Harvard Business School professor, Clayton Christensen, reports that over 30,000 new products are launched every year, only 5% of which succeed. 

Most times, it’s because of poor market research. They have not asked the fundamental question: Why do people want this? 

If there’s no need for your product, it won’t sell. Understand the consumer demand first and then design your product around that need. From there, identify your unique selling point (USP) that makes your product valuable to buyers and differentiates you from competitors.

Product Questions to Ask Yourself:

  • What does the customer want from my product? What need(s) does it satisfy?
  • What is my USP?
    • What advantages does my product offer to meet the user’s needs?
    • How do I differentiate my product/service from competitors?
    • Are there features a competitor product has that mine does not? Are there features that the consumer does not deem valuable or worth paying for?
  • Does my product have a name? How is it branded?
  • How do I intend consumers to my your product? Are they using it correctly? Where will they use it?

Answering these questions can help you understand the end user’s view of your product and can help drive additional marketing decisions because you understand what problem your product solves.  

2. Price

Price is what the consumer is willing to pay for your product. While it’s a generally easy concept to understand, it can be tricky for many businesses to apply — prices that are too high push users to search elsewhere; prices that are too low cut into your profit margins. 

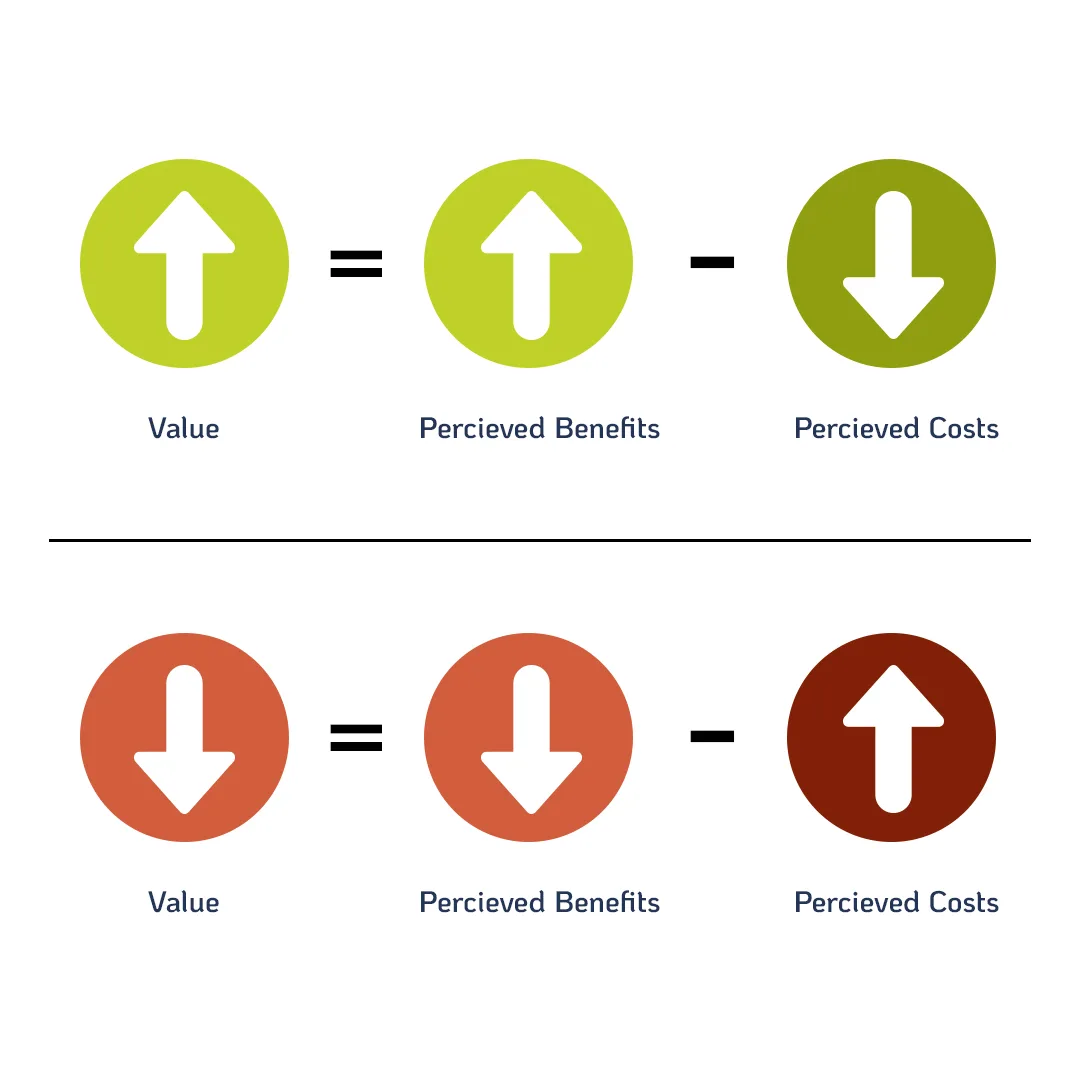
Understanding your target audience and the relationship between perceived benefits, price, and value can help simplify the process. If perceived benefits increase or price decreases, the perceived value should generally go up. But if perceived benefits decrease or the price increases, the perceived value goes down.

Tower Social July Benefits 1 jpg The Digital Marketing Mix: How the 4Ps Have Evolved in the Age of Internet Marketing

If consumers don’t see any perceived benefits in your product, or if they decide the benefits aren’t worth the price, your product’s value will decrease and you’re less likely to make sales. 

Opportunity Cost

Since a large part of the pricing model relies on what consumers perceive as valuable, your business needs to understand what the consumer feels they are losing out on by choosing your product over the others — also known as the opportunity cost. 

Here’s an example: I have $350. I can spend it on Facebook ads that might generate leads, or I can use it on Google text ads. If I spend the money on Google ads then I forfeit the opportunity Facebook ads might bring in. The loss of those potential Facebook leads is the opportunity cost.

In this situation, I have to make the decision of what I find more valuable. Will Google or Facebook get me the leads I need? Which is the most cost-effective? Which is easier to manage? Where is my target audience most likely to be?

Your customers will ask themselves similar questions before making a purchase: will this product make my life easier? Am I getting my money’s worth? If you can anticipate those opportunity costs, you can use them to your advantage to choose a price that’s appropriate in your market.

Factors That Affect Product Pricing:

There are so many factors that can impact the price of your product, some of the most common including

  • Competitive offerings and prices
  • Market share
  • Product branding and quality
  • Materials or input costs
  • Customers’ perceived product value and fair price.

Depending on the factors that are most important to you and your target market, you can price your product appropriately using one of the following approaches:

  • 1. Demand-oriented pricing: set the price based on the demand for the product or service. If demand is high, consumers might be willing to pay more for the product.
  • 2. Cost-oriented pricing: consider how much it costs to make your product and markup accordingly so you see a profit.
  • 3. Profit-oriented pricing: determine your business’s profit goals and test out prices that yield your desired return on sales (ROS). 
  • 4. Competition-oriented pricing: price your product similarly to your competitors to compete with their market share.

Pricing Questions to Ask Yourself:

  • What is my product’s perceived value in the eyes of the consumer? 
  • What is the lowest cost I can charge while still selling enough to be profitable? 
  • Is my target market price-sensitive? What effect will changes in price do in the marketplace? 
  • Should I increase or lower the price?
  • Are my prices competitive?

Don’t forget to also consider making adjustments to your price. Seasonal discounts, trade-in deals, and other cost-saving measures can prove to be successful in many markets. Make sure you have a plan in place to monitor your price to handle the ebbs and flows of demand.

shutterstock 102061732 jpg The Digital Marketing Mix: How the 4Ps Have Evolved in the Age of Internet Marketing

3. Place

Place refers to where the consumer is able to purchase your product. It solves the complicated process of getting the product from the manufacturer into the hands of buyers. 

Traditionally, place referred to strictly brick-and-mortar locations. But the internet has added some complexities to this principle of the digital marketing mix, opening the door for many more distribution channels to meet consumers where they are. 

Ecommerce sites can be an incredibly useful place to sell your product. In 2021, retail eCommerce retail sales exceeded $5 trillion US dollars globally — a number that’s projected to rise above $8 trillion by 2026. 

If your site is lacking online retail capabilities or you’re not selling your product through third-party marketplaces online, you’re limiting your place strategy. It’s one of the easiest ways to increase your brand’s reach.

Places and Accessibility

Smartphones (and the internet in general) allow the consumer to have a 24/7 marketplace accessible from anywhere at any time.  It is critical that your brand exists in the digital space. Not only that, your business should easily found and active in that space.

Examples of Online Places Include:

  • Websites displaying interactive ads
  • Search engines highlighting shopping ads
  • Google search results
  • Emails
  • Social channels such as Facebook, Instagram, or Pinterest

Making your products accessible to the users at a time and place that is most convenient to them will give your business a competitive advantage. 

Place Questions to Ask Yourself:

  • Where is my target market searching for products? Are consumers looking in brick-and-mortar stores? Online? Direct sales?
  • Do I have access to the medium or channel? Do you have expertise and knowledge of how these channels perform? Can I optimize the efficiency of these distribution channels?
  • Where are my competitors most active? Where do they push their products? Are they utilizing a channel that I‘m not?

Because there are so many more “locations” or channels for the consumer to find your product, deciding on the placement of your product can be a challenge. It’s crucial that you get to know your target audience to determine which distribution channels are most likely to convert into a lead or sale.

Erica screenshot The Digital Marketing Mix: How the 4Ps Have Evolved in the Age of Internet Marketing

4. Promotion

Jim Blyth defines promotion as “the marketing communications used to make the offer known to potential customers and persuade them to investigate it further.” Simply put, it’s your strategy for getting people to notice your product or service. 

Thanks to modern technology, businesses have more channels than ever to communicate through. A few examples can include Google My Business listings, sponsored ads, Instagram posts, email newsletters, and much more.

These tools can help your brand personalize your marketing by tailoring your message to a specific user. Using GA4 and consumer engagement reports, you can even determine where your audience is most active and segment them according to mobile devices, browsers, and operating systems.

Which Channels to Use

When deciding on distribution channels, it’s important to make sure it fits your audience and your brand. Here are some major online distribution channels:

  • Search Engines
    • Organic search results (e.g. Google and Bing)
    • Paid/sponsored listings (e.g. Google and Bing)
  • Display Ads
    • Banner Ads
    • Interactive Ads
  • Social Media (posts and Ads)
    • Facebook
    • Instagram
    • LinkedIn
    • Twitter
    • Pinterest
    • YouTube
  • Digital word-of-mouth
    • Forums (e.g. Reddit)
    • Wikis
    • Influencers (e.g. bloggers)
    • Business listing (e.g. Yelp)

Promotion Questions to Ask Yourself:

  • What potential channels are available to communicate my message?
  • Where are my competitors promoting their products or services? Where are they active that we’re not?
  • Which is the most effective channel to communicate through? 
  • What is an appropriate cadence for our promotion? 

How you choose to promote your product or service can make all the difference in converting leads into sales. 

5. People

In the digital marketing mix, people refers to anyone who represents your product and comes in contact with the consumer. Aside from your customer service team or sales force, people can include your employees, business partners, or anyone that consumers associate with your brand. 

It’s important you’re hiring people who understand your brand’s vision and believe in your goals. You should be able to trust that when they come in contact with customers, they’re representing your brand in a positive light. 

This is increasingly important if your brand is on social media. 

Social Media Relationships

Social media, online forms, emails, and other internet platforms have created a way to interact with customers directly. These added relationship factors give your brand the ability to:

  • Respond quickly to users asking questions on Facebook, Instagram, Reddit, etc.
  • Add insightful recommendations via Quora
  • Respond to negative reviews on Google Reviews or Yelp 

Businesses that are utilizing these platforms can leverage the power of relationship-building where customers are active. Interacting with your customers directly on these platforms can strengthen trust and keep consumers coming back to your brand.

People Questions To Ask Yourself:

  • Do my employees understand our brand identity?
  • Do my business partners understand our company goals?
  • Is our company culture positive?
  • Are my employees skilled in basic social media strategy
  • Have I set clear expectations for my employees to follow when interacting with customers?

The bottom line: your people represent your brand. How they interact with customers can make or break their perception of your product or service. 

shutterstock 2277964435 jpg The Digital Marketing Mix: How the 4Ps Have Evolved in the Age of Internet Marketing

6. Process

Process is defined as the core tasks and operations required to deliver the product or service to your customer. This can refer to anything from logistics and shipment and delivery to wait times and check-out processes. 

If your customers find your processes to be too complicated — for instance, the time from placing an order to receiving it is too long — you’re likely to lose out on future sales. 

To optimize your processes and create the best experience for your potential customers, it’s critical to understand the user journey. If you can simplify the sales funnel and make the process from initial brand discovery to purchasing feel natural, the greater your chances are to convert. 

Process Questions To Ask Yourself:

  • How easy is it to navigate through our website? Is it easy to make a purchase online?
  • How long are our delivery times? How does this compare to competitors?
  • Do we have enough staff to cover the amount of purchases/requests being made?
  • Are there any internal process barriers keeping us from delivering customer value?
  • Have our customers complained about our process? Where are they dissatisfied? 

Listening to customer feedback can be a really useful tool for defining your process strategy. Take customer complaints as an opportunity to reevaluate your current process and strategize how to fix it. 

7. Physical Evidence

The final P in the online marketing mix is physical evidence. It’s the proof that your product or service exists and is credible. In the online universe, your brand’s digital footprint can serve as your physical evidence. 

Your website is the most important measure of physical evidence for most people. If it’s up-to-date and easy to navigate, your brand can seem more trustworthy. 

Personal touches like thank you notes, confirmation emails, and receipts after a purchase can be another piece of physical evidence to keep your brand top-of-mind for customers. 

Additionally, it’s important your brand is represented on social media. You should be prioritizing creating solid brand awareness across multiple platforms and channels. Existing on these platforms and staying active can build credibility.

Physical Evidence Questions To Ask Yourself:

  • What post-purchase procedures do we have in place? Is there anything we could improve on?
  • Are we represented across multiple channels? Is our branding consistent across each?
  • Does our website provide a positive first impression? Is the UX positive?
  • Are we actively responding to customers on social media or via email? 

The more time you spend expanding your message across multiple channels and platforms can greatly increase the value the customer finds in your brand, product, or service. 

An Integrated Marketing Approach is Best

Increase your share of voice by choosing an integrated marketing approach. When you start using the 7Ps of the digital marketing mix, you can multiply your reach using a consumer-centric strategy.

computer displaying analytics

Digital Marketing Mix Checklist

  1. Identify the product or service. What is the Unique Selling Proposition (USP)?
  2. Research and understand your target audience. Who are your potential customers? What do they search for? Is your product relevant to their needs?
  3. Research and understand your competition. Is the market highly competitive or are you a pioneer? What can you learn from other businesses competing in this space?
  4. Assess the channels (space) where your customer engages with your product. Understand the pros and cons of each platform/place.
  5. Test your digital marketing mix. Ask customer-focused questions:
    1. Does the product meet the user’s need(s)? (Product)
    2. Is the pricing right? Or does it need to change? (Price)
    3. Where are the consumers? Are your marketing channels delivering as expected? (Place)
    4. Is your marketing message resonating with the target audience? Do they understand? Do they feel confident in making a purchase? (Promotion)
    5. Do my employees positively represent our brand? (People)
    6. Is it easy to purchase and receive our product/service? (Process)
    7. Can we be found across multiple marketing channels? (Physical Evidence)
  6. Review your marketing plans & adjust each of the elements to cater to your user, market, and business needs.

Need help implementing an integrated approach to your marketing plan? Our digital marketing team has been solving that problem for our clients for over 25 years. Contact our team for a consultation.

Editor’s note: This blog was originally published on June 16, 2020. It was updated on January 23, 2026.

The big countdown to GA4 is finally coming to a close, and it brings a lot of changes, which include user engagement metrics. We’ve outlined the 8 key GA4 differences you can expect, but now we’ll explore how to use the engagement metrics in Google Analytics 4 to your advantage. 

Once you become familiar with user engagement in Google Analytics 4, you’ll be able to use these metrics to better define your marketing strategies and ultimately gain an extensive understanding of your audience.

What User Engagement Metrics Should You Track?

There are a lot of metrics for you in GA4, and trying to track all of them would be very overwhelming. On the other hand, if you’re not tracking the right ones, you might become more confused about what’s successful for your company and what needs work. 

As you consider what metrics to track, you should align this with the purpose of your website and your company’s marketing goals. For example, if you’re looking to sell your products or services online, your KPIs are going to look slightly different than a company looking to provide thought leadership to its audience. 

Below, we’ll outline some of the most influential user engagement metrics you can track to know the effect of your marketing strategies. 

In appropriate sections, we’ll highlight an industry average or target range. This may vary depending on what type of industry you’re in, so you can always use Google’s benchmarking tool to find specific averages on user engagement.

a screenshot of a reports column with sessions, engaged sessions, sessions per user, users, and new users.

Users

There are three different types of users that you should be aware of in Google Analytics 4. Each is similar but tells you a slightly different story about what your audience is doing on your website. 

  • New Users. In Universal Analytics, each device counted as a new user. However, GA4 will use cross-device tracking to recognize the same user on different devices.
  • Total Users. Similar to what you’ve seen before, total users let you know the number of users that had an event on your website during a specific period of time.
  • Active Users. Active users are a new metric you can track within Google Analytics 4. These are engaged users, or someone who stayed on the page for longer than 10 seconds, had a key event or visited more than 2 pages on your website. Ideally, a good benchmark for active users is 60% – 70% of your total users. 

*Note that in Google Analytics 4, active users will be labeled as just “users”.

Why is this metric important for understanding user engagement? Increasing new users is a really great indicator that your brand awareness is growing. If you want to take this a step further, you can also see how many of these users are engaging with your website, viewing multiple pages, and spending more time on your site.

If you’re noticing that you have a lot of new users but not as many active users, it may be because your site needs some UX improvements so visitors are given a great first impression of your website.

Engaged Sessions

The engaged session metric will also be something new with Google Analytics 4. Just like with an active user, an engaged session is when someone spends more than 10 seconds on your site, viewed more than 2 pages, or completed a key event. 

An additional, new metric in Google Analytics 4 is engaged sessions per user. This number can be found by dividing the number of engaged sessions by the number of total users. So, if you have 683 engaged sessions and 1,100 total users, your engaged sessions per user is 0.62, or 62%.

Just like your active users, a good benchmark for your engagement rate is anywhere between 60% – 70%

Why is this metric important? What we provided above highlights your entire website’s engagement. But you can also narrow this down to specific pages. By finding specific pages that have higher engaged sessions, you can continue to promote that product/service/insight on multiple platforms. 

On the other hand, you can find pages that aren’t performing as well and have lower engaged sessions. This could be a great indication to rework those pages, rewrite the blog, or to better promote the page across different mediums, like social media and email blasts.

Bounce Rate

Since engaged sessions are now an engagement metric in Google Analytics 4, you can use it to get a better idea of what your bounce rate percentage is. Simply inverse the percentage of engaged sessions to get your bounce rate. 

This bounce rate will tell you how many users stayed less than 10 seconds on your site. So, continuing with the example above, if the engagement rate is 62% that means that 38% of total users went to your site and then immediately left.

Average Engagement Time

This is an important metric to show you how long your active users are spending on your website. If you’re noticing that people aren’t spending a lot of time on your page, and aren’t converting, it’s likely that something needs to be adjusted. 

Again, use this metric to see where users are spending the most time on your site. If you’re noticing that your blog posts, case studies, landing pages, or other online materials are getting little engagement time, try creating evergreen, engaging, and authentic content.

Events

Now the main difference you’ll see in UA vs GA4 engagement metrics is it’s now tracking events rather than goals. Ultimately, this is going to help you see a more well-rounded view of your users and their engagement. 

An event now includes any activity on your website, from a form being filled out to a user viewing one of your pages. This is where it is essential to analyze what you want to know about user activity on your website. 

Make sure the events you are tracking are the most important for measuring your marketing strategies. So, if you’re an eCommerce website, you probably want to be tracking when users are browsing the inventory, adding products to their carts, and eventually checking out. 

If your website’s main objective is to disperse information and show yourself as an industry expert, you should be tracking events that occur on your blog posts or case study pages. Events like page scroll depth, video progress (if relevant), and clicks.

a screenshot of conversion examples in Google Analytics 4.

Key Events

In Universal Analytics, you had to set up goals that would then track your key events. It’s going to look a bit different in Google Analytics 4. All goals have turned into events, and you can mark your most important events as key events, previously known as conversions. 

Simply select the start to indicate which events you’d like to mark as key events. We recommend marking events like form submissions and phone calls as key events.

Screenshot 2025 07 18 at 2.12.00 PM How to Effectively Review User Engagement in Google Analytics 4

Why is this metric important? No matter the purpose of your website, you’re going to want users to take action. Key events are one of the best ways to track user engagement in Google Analytics 4. 

Not only can you see specific actions being taken, but you can see where these key events are coming from. You may see key events come from an email campaign you sent out, a social advertisement, or a pay-per-click campaign. 

Especially during a time when you need to reevaluate your strategies, being able to see where key events are happening can help you focus your attention on those specific channels. 

How to Improve Engagement Metrics in Google Analytics

With a little time, specific tools, and website testing, you can make changes that will benefit users navigating your site. 

Explore the Why

In marketing, there isn’t usually a one-size-fits-all answer as to why things are happening. Here are a few tips you can explore to gain a more accurate depiction of ways to improve your engagement metrics. 

Depending on your industry, there could be multiple reasons for a decrease in engagement. If you work in an economically dependent industry, this could play a huge factor in site engagement. 

There will be similar effects if your business has a seasonality factor. If that’s the case, try comparing year-over-year data rather than month-over-month, so you can get a better view of what’s happening through each season of the year. 

If you are seeing dips in engagement, don’t panic! What’s important is that you’re continuing your strategies and creating engaging, evergreen content that can be used across multiple platforms to engage more of your audience.

Encourage Engagement Across Multiple Channels

It’s important to reach your audience where they are. Cross-promotions allow for your message to spread to a wider audience, nudging them to visit your site and discover your content. 

You can use various internet marketing tactics like content writing, email newsletters, social media advertising, and pay-per-click advertising to capture your user’s attention and send them to your website.

Test Your Theories

As we said, there sometimes isn’t a definitive answer to why engagement is increasing or decreasing. So, it’s never a bad idea to test what you think may be the reason for the fluctuation or try implementing a new strategy. 

When you’re A/B testing, make sure you’re not changing everything at once. You should only change one element at a time, so you can accurately identify the most positive effects on your user engagement in Google Analytics 4.

Need help analyzing your current strategies and pinpointing areas of improvement on your website? Contact our specialists today!

This blog was originally published on September 25, 2019, and updated on June 28, 2023.

Traditional radio still exists, but it’s like a flip phone. It’s still on the market, but why would you spend money on one when the smartphone exists? If you’re a marketer trying to reach listeners through traditional radio you might be wasting your budget. 

But that doesn’t mean that you should scrap radio from your advertising budget altogether. It simply means that advertisers must evolve their marketing distribution channels. In the era of music streaming, marketers can leverage internet radio to reach their desired audience. 

Because let’s face it — music and sound are captivating. Learn the properties of sound that make audio ads so effective and how to create Spotify ads that help you achieve your marketing goals.

What Makes Sound Effective?

Imagine you’re driving and you hear a fire siren. What are your first thoughts? You might be able to infer (1) there’s been a fire, (2) it’s within miles, and (3) that help is on the way. When you hear the siren, what do you feel? Maybe you feel uneasy or that danger is near. That’s the impact that sound can have on our minds. 

Sound has the power to deliver information and evoke a feeling — we can observe that in the siren example. If your businesses can leverage those same elements of sound in your marketing, the return can be abundant.

Following the logic of the siren model, your company can communicate information about your brand and evoke a feeling from your listeners through sound, too. Using Spotify’s self-serving advertising platform, you can easily create Spotify ads that drive brand awareness and influence consumer behavior.

Advertising On Spotify: The Basics

Before jumping into how to create Spotify ads, there are some basics to understand about the platform, including how ads are delivered, the different ad formats, and their costs.

Spotify’s Ad Delivery Model 

Like most software as a service (saas) companies, Spotify uses the “freemium” business model. This means users can join to experience the basic product features for free. To use the advanced options, they are incentivized to upgrade to a premium subscription.

In Spotify’s case, users can set up an account to listen for free. Among other restrictive features, freemium listeners are severed 15- to 30-second ads throughout their listening experience; and yours can be one of them.

Types of Spotify Ads

There are four types of Spotify ad experiences that your marketing team can consider when building out your ads:

1. Audio Ads

These are the most basic ads that brands can run on Spotify. They are audio spots, up to 30 seconds long, that Spotify plays in between songs. They’re sometimes referred to as “all-platform” ads because they’ll run on any device, in any environment, and at any hour of the day. 

If you’re just starting out, audio ads are a good place to begin because they are inexpensive and Spotify can guarantee your ad will be heard, since they are only delivered to “in the moment” listeners. This means the ads are only played for users in active sessions. 

The minimum budget for running a basic audio ad is $250. 

2. Video Ads

Video takeover ads merge the strengths of audio and video to reach listeners. In this model, you have the ability to show listeners about your brand, not just tell them. The nature of video ads requires that they’re only shown to users actively browsing with the screen in view. 

In some ways, the delivery model for video ads can limit your ad’s reach. But, in a study conducted for Dentsu International’s Attention Economy series, researchers found that Spotify video ads improved the platform average for holding users’ attention by over 150%.

If your brand has the production means and budget to create a video takeover ad, it could be worth the investment. Keep in mind, the minimum budget to run this type of ad is $250, plus whatever you spend on production.

3. Podcast Ads

Spotify premium promises “ad-free music listening,” but they don’t mention ad-free podcast listening. That means if you elect to run podcast ads, you have the ability to reach freemium and premium Spotify users. 

Being able to reach premium and free listeners doesn’t mean your ad will be more successful, however. All users have the ability to pause, fast forward, and rewind to any part of the podcast episode, meaning you might be risking the chance for your ad to be heard at all. 

The minimum budget to run this type of ad is $500.

4. Custom Experience Ads

Sponsored playlists, overlays, homepage takeovers, and leaderboard ads are some of the custom experiences Spotify offers to advertisers. They are multi-format ads designed to be more unique to your brand. 

To put together a custom experience ad, marketers must work with a Spotify ad specialist, so this is not a true self-serve option.

How To Create a Spotify Ad

Now that you understand the basics of how Spotify advertising works, let’s jump into the actual process of creating your ads. We’ll outline how to create a Spotify ad in 6 steps and provide visual examples from our team. 

1. Create Your Account

If you don’t have one already, the first step is to create your account. You’ll be prompted to fill out some basic information about you and your brand. Once it’s created, you’ll be directed to your dashboard.

Screenshot 2023 02 01 at 1.41.33 PM 3 How To Create Spotify Ads: A Complete Guide on Leveraging Sound in the Age of Streaming

2. Create Your Campaign

Now it’s time to create your first Spotify ad! You’ll start by creating a new campaign. If you’re familiar with Meta’s ad manager, the hierarchy of campaign > ad sets > ads is the same. 

For general organization and tracking purposes, we suggest creating a single campaign per year, and simply creating a new ad set for each new ad during that year. This can help you compare ad performance year over year. 

Click “Create Campaign” in the upper right corner of the screen. After you name your campaign, you’ll have to select the objective and placement of your ads. In this case, we selected “A brand, product, or organization” as the objective and “music” for the placement, but feel free to adjust accordingly.

Screenshot 2023 02 01 at 9.18.24 AM 3 How To Create Spotify Ads: A Complete Guide on Leveraging Sound in the Age of Streaming

3. Update The Ad Set

At the ad set level, you will determine your ad format, audience, budget, and schedule. 

Ad Format

With music selected as your ad placement, you can choose between audio or video ad formats. We recommend starting with a basic audio ad to run across all platforms. 

If you need to update the platforms, know that the option is available to you, but Spotify (and us) recommend maximizing your reach with all platforms especially since you’re just starting out. 

Audience

Here, you’ll choose your target audience. You can do this by selecting 

  • Locations
  • Ages
  • Genders
  • Interests
  • Behaviors
  • Postal Links

When setting your age preferences, you’ll have to select by predetermined ranges. Spotify doesn’t have the option to set your own, so you can’t narrow it down quite as much as some other platforms.

Where you can really start to define your audience is under the “Interests and behaviors” section. You can narrow it down by topics of interest, music genres, or real-time contexts.

Screenshot 2023 02 01 at 9.30.50 AM 3 How To Create Spotify Ads: A Complete Guide on Leveraging Sound in the Age of Streaming

If you’re in a niche that Spotify’s preset options support, real-time contexts could be something really cool to explore. This feature allows Spotify to deliver your ad to people participating in specific behaviors based on user-curated and Spotify-curated playlists. 

Budget & Schedule

Time to determine how long you want your ad to run and how much money you’d like to spend. Remember, the minimum for an audio ad is $250, but you can enter a custom amount. 

Then set the start and end dates for your ad to run, along with the hours that you’d like it to deliver. Unless you’re putting together several ads within the same ad set, you can keep the delivery hours at Spotify’s default settings. You’d only need to change it if you have multiple ads that you’d like to rotate to listeners. 

The final step of updating the ad set is to set your bidding preferences. This includes setting a bid cap and a frequency cap. Spotify requires that you choose a bid cap, and before you panic — they will recommend an amount for you based on similar audiences. We suggest choosing a number in between the range that they offer. 

Setting a frequency cap is not required, but it might be something beneficial to consider. By doing so, you can control the maximum amount of times your ad is delivered to the target audience per day, week, or month. 

We’ve all experienced getting served the same ad over and over and over again. Eventually, it becomes a nuisance, and it could actually cause listeners to form a negative impression of your brand. Setting a frequency cap can help avoid this and gives you some more control over the delivery of your ad.

Screenshot 2023 02 01 at 11.01.31 AM 3 How To Create Spotify Ads: A Complete Guide on Leveraging Sound in the Age of Streaming

4. Build Your Ad

Now it’s time for the fun part: building your ad! If you already have an audio clip recorded and mixed, you can upload it directly to Spotify. If you don’t, you’ll have to write a script and Spotify will record the voiceover for you. 

The latter option comes with some additional decisions. You’ll have to choose a voice actor, which Spotify makes easy. Then, you’ll have to give the voice actor some context. You can instruct them on the tone, speed, and emotion you’d like your ad to deliver. 

Next, you’ll choose some background music. Spotify has a limited library of music that you can use, or you can upload your own. Tracks must be under 30 seconds long. If you’re uploading a file longer than that, you can edit which part of the song plays, but only after Spotify sends back your recording. 

The next step is to upload an image and update the text that will show on the listeners’ screens. If you have a branded photo you’d like to use, you can upload it to Spotify. If you don’t, Spotify also has a small library of generic ad images advertisers can choose from. 

Finally, you’ll add your brand’s name, choose your call-to-action button’s text, and the button language. If you use UTM tracking to gather information for Google Analytics, you can add your URL here, too.

Screenshot 2023 02 01 at 11.40.03 AM 3 How To Create Spotify Ads: A Complete Guide on Leveraging Sound in the Age of Streaming

5. Submit Your Ad For Review

When you’re satisfied with your ad, the final step is to submit it for review. Typically, it takes 1-3 days for Spotify to record and mix your ad. When your ad is ready for a final review, they’ll send it back to your dashboard where you can approve or revise the recording. 

Sometimes the Spotify voice actors send back recordings that don’t match the tone or pace that you intended. Luckily, Spotify allows advertisers to submit revisions for voiceovers, so you have the option to send the ad for a rerecording with different instructions. 

The only downside is that if you’re unhappy with the voice actor in general, Spotify doesn’t yet allow users to send a request for a new voice. If you want a new voice actor, you’ll have to reject the ad and start from the beginning.

Key Takeaways

At this point, you should have all the basic information you need to create a Spotify ad.  Like most new things you try, it’s going to take some time to perfect. Don’t be afraid to experiment and try something new with your targeting or your script! You always have the ability to edit the ad throughout the month if it’s not yielding the results you’d like. 
Are you ready to take your internet radio marketing to the next level? Reach out to a team member to start working with an experienced full-service agency.

We’ve already created a Facebook Ads Checklist, but that’s not the only great social media platform to advertise on. LinkedIn can be an exceptional tool to target the right audience and move users through the customer journey. 

LinkedIn can also be overwhelming and intricate until you really nail down your audience, ad formats, and campaign objectives. This is why we’ve created this LinkedIn Ads Guide, so you can feel a little more confident as you start the process.

Before Starting Your Campaign

Before we get into the meat and potatoes of your LinkedIn ads guide, you’ll first want to set up a LinkedIn business account. Once the page is made, you’ll know it was successful if you have an “advertise” icon on the top right page of your personal LinkedIn page.

a screenshot showing the top bar of a LinkedIn profile with the "advertise" icon in the top right corner.

Your campaigns will only improve the more you post organically on your business page. This is the same across all platforms. As you start to advertise on LinkedIn, your profile will be gaining more traffic, so you want to make sure there is credible and beneficial content on your page.

Step 1: Set Up Your Campaign Group

There are three levels in LinkedIn Ads Manager that are listed below. We’ll go through each level and give you insight into how to succeed at each step. 

  1. Campaign Group
  2. Campaign
  3. Ads

If you’re familiar with Facebook advertising, think of your LinkedIn Campaign Group as a Campaign in Ads Manager. It’s the first step and the shell that will hold all of your individual campaigns. 

You can organize your campaign groups however you feel fit. At Tower, we create monthly campaigns, so we organize our campaign groups annually. Meaning, we create a new campaign group once every year. 

By organizing your campaign groups in an easy way, either annually or bi-annually, you’ll easily be able to look back at previous campaigns and consider running the same ones again.

Step 2: Add Your Campaign

The next few steps in this LinkedIn ads guide are all under level 2, or the campaign level. You will choose a campaign objective, audience, ad format, budget, and schedule. Under each step, we’ll cover LinkedIn ads’ best practices so you can create a successful campaign. 

When you initially create your campaign, you have to put it under a campaign group. This is why it’s important to accurately name and organize your campaign group.

screenshot of a how a user can select a campaign group for their LinkedIn campaign to go under.

Create a Campaign Objective

When comparing Facebook ads vs LinkedIn ads, you’ll notice there are similar campaign objectives to choose from. Below is the list of each available LinkedIn campaign objective.

  • Brand Awareness. This will get your advertisement out to as many people as possible, showing them your product or service. This would be a good campaign objective for a newer LinkedIn business profile. The main objective in this campaign will to be increase impressions.
  • Website Visits. If you’re looking to drive traffic to your website, then we suggest using the website visits objective. You can choose to take consumers to a contact page or a specific landing page related to your advertisement. 
  • Engagement. Creating engaging content should be a goal for your campaign no matter what, but this objective will show your advertisement to users that are likely to follow your page and engage with your content.
  • Video Views. If you’ve created a great promotional video, then this LinkedIn campaign objective is for you! If you choose this as your campaign objective, you must use the LinkedIn video ad format. Your ad will be shown to users that are most likely to watch your entire video. 
  • Lead Generation. LinkedIn lead gen ads allow the user to fill out a form directly from your ad. This information can then be found under “Assets” and then “Lead Gen Forms”. 
  • Talent Leads. This LinkedIn campaign objective is used for your company to engage with potential employees for your organization. You’ll likely want to send users to your career page so they can learn more information about your company. 
  • Website Conversions. Linkedin conversion ads are only available if you have conversion tracking set up. If these are set up, LinkedIn has the ability to track conversions from your advertisement. 

    You are able to track conversions within that window between a determined time period (usually up to 90 days) after the ad runs.  So if a user doesn’t immediately take action, don’t worry! LinkedIn will still be able to track the conversion. 
  • Job Applicants. This is similar to talent lead ads. LinkedIn will show your job opportunity to users. Your audience is a crucial part of this ad objective because you want to receive views and engagement from qualified candidates.

Note: Once you click “save and exit” at the bottom of the page, you will not be able to change your campaign objective without starting over!

Step 3: Craft Your Audience

Throughout this entire LinkedIn Ads Guide, you’ll find expert insight into best practices, but we believe that the most crucial step is crafting your audience. LinkedIn gives your company the ability to specify a variety of characteristics.

An example of a LinkedIn audience within Campaign Manager

These audiences are very intricate and granular, which at first glance, can be overwhelming when you first start. Don’t worry, sometimes it takes months to craft an audience where you see high click-through rates and engagement. 

In your LinkedIn audience, you can specify the following

  • Location
  • Job title
  • Job functions
  • Age
  • Years of experience
  • Company names

The characteristics above can be excluded from your audience as well. For example, you won’t want to show your advertisement to competing companies. Or if you’re restricted to a certain location, you’ll want to exclude outside areas.

This helps you get the most out of your budget, which we will talk about more in step 5. However, with these specific characteristics, comes finicky rules. Sometimes, you can’t include something in your audience and then exclude another thing. 

At first, this can be confusing and perhaps a little annoying. But here’s an example: you cannot include Job Titles in your audience and then exclude Job Functions. LinkedIn will give you are warning message and grey out the attribute.

An example screenshot showing that Job Functions cannot be excluded when Job Titles are included.

As you are building your audience, you’ll see “Forecasted Results” on the right-hand side. This is a great indicator of the size and segmentation of your drafted audience. It helps you get an idea of who will be seeing and engaging with your audience. So, if it’s not exactly the right fit, you can adjust the audience before the campaign goes live.

Retargeting Audiences

In addition to the audiences above, another benefit of LinkedIn ads is the ability to retarget specific contacts or companies. This technique enables you to pull together an audience very specific to your ideal market.

A screenshot showing the two options for retargeting audiences, a contact list or a company list.

Another type of retargeting audience on LinkedIn is pulling information on who has visited your profile, or website, or filled out a lead generation form. This type of audience typically has a higher click-through rate because there are fewer barriers if they’ve already interacted with your site. In time, this could lead the customer to convert further down the consumer funnel.

These functions can be found under “Assets” in your Linkedin ads manager.

Step 4: Choose Your Ad Format

It’s finally time to review the different LinkedIn ad types you can choose from within your campaign. We’ll provide an overview of each type here, but you can find more information on LinkedIn’s support page

The options you have for your ad format will change depending on what you choose for your campaign objective.

A screenshot showing the different types of ad formats that you can use in your LinkedIn campaign.
  • LinkedIn Single Image Ad. Simple enough, this ad will show one photo with ad copy. 
  • LinkedIn Carousel Image Ad. Give users multiple photos and headlines in one ad. The call to action will have to be the same across each image card. 
  • LinkedIn Video Ad. Highlight your promotional video through a LinkedIn video ad. You must provide a headline for this type of ad, but additional ad copy, or introductory text, is optional. 

    Your video can be used with a variety of campaign objectives depending on your company’s marketing strategy. For example, if you want to use your promotional video to drive traffic to your site, you can use the website visits campaign objective. 
  • LinkedIn Text Ad. This ad is shown on the right-hand side of your LinkedIn desktop feed. You’ll have a limited character count to capture your audience, so this ad format needs to truly stand out. 
  • LinkedIn Spotlight Ad. Spotlight and Follower Ads are personalized to a LinkedIn profile. Spotlight ads show a specific offering that aligns with your target audience. 
  • LinkedIn Follower Ad. On the other hand, Follower Ads are also personalized but are used to promote a company page rather than an offering. 
  • LinkedIn Document Ad. This is a relatively new ad format that LinkedIn has introduced. You can now let users read and download documents directly from the advertisement. This is beneficial for sharing high-quality content with your targeted audience. 
  • LinkedIn Message Ad. We’re sure you have received a message ad in your LinkedIn inbox. These are a more personalized way to reach your target audience. Be wary, a user can get annoyed by the overload of ads in their inbox, so you want to make sure yours stands out from the rest.
  • LinkedIn Conversation Ad. These are similar to message ads but you can include multiple call-to-action buttons rather than a single call-to-action. This means you can link users to a landing page and a lead gen form, all in one message.  
  • LinkedIn Event Ad. Advertise your LinkedIn event that will show in your target audience’s feed. 

LinkedIn is a very effective way to target your audience and bring awareness to your brand but all of these options can make for a puzzling start. Our specialists are here to help you through the trial process and onto being successful with your LinkedIn campaigns.

Step 5: Set a Budget and Schedule

Similar to Facebook ads, you can decide either to set up a daily budget or a lifetime budget for your campaign. LinkedIn ads’ minimum budgets are $10 a day, or a lifetime budget of $100. 

When you set up your schedule and budget, LinkedIn may warn you that the budget you’ve allocated is not enough for the entire duration of your ad. If this warning pops up, you must either shorten the duration of your advertisement or add more to your budget.

Step 6: Create Your Ads

Set up is complete! It’s now time to create your ads. LinkedIn has made it really easy to reuse photos and videos from previous campaigns through a recently added tool, LinkedIn ads library. 

When creating your ad, you want to name each ad to easily identify them. This is especially important if you are creating multiple ad variants. LinkedIn has recently stated that campaigns with up to 5 ad variants can receive a 12% higher click-through rate. 

LinkedIn ad specs suggest vertical images with a size of 1200 by 627 pixels. These best practices can also help increase your campaign’s click-through rate.

Screenshot of the screen you'll see when you are creating a LinkedIn ad.

Writing Your Headline and Introductory Text

Something positively different about LinkedIn ads vs Facebook ads is the character count for the headline and introductory text. You have a lot more breathing room on LinkedIn compared to Facebook. 

Your character count can be up to 200 characters long and your introductory text can be up to 600 characters. LinkedIn best practices suggest having a headline of up to 150 characters so it’s concise for better engagement. 

Introductory text that is over 100 characters risks being truncated on the desktop. In order to avoid this, you’ll want to keep the copy around 75 characters. However, sometimes it is necessary to add more text, and there are times these ads perform very well. 

In that case, keep in mind where your text will truncate so you can complete a clear thought before the copy is cut off. Just in case a user doesn’t take the action of clicking to see the entire ad copy. 

The final step in the actual creation of your LinkedIn ad will be choosing a clear call to action. LinkedIn has a predetermined list for you to choose from. It’s important to select a call-to-action that represents what you want your audience to do with the ad.

Screenshot that shows the different options a user has for a call to action button.

Step 7: Launch your Campaign!

Once you’ve finalized steps 1 through 6, it’s time to launch your campaign! LinkedIn strives to review ads within 24 hours of submission, so you should know pretty quickly if something isn’t approved. 

Under each of the three levels, campaign groups, campaigns, and ads, you will be able to see the “status”. As you’re working through the campaign, the status should be “draft”. This means you can still edit the campaign and launch it. 

Most commonly, if everything is approved, it will either say “active running” or “active not started”. Active running means the campaign is currently running and being shown to your target audience. Whereas active not started means the campaign is ready but scheduled to run in the future. 

When the status of your campaign or ad is “active not running” it means there is further action you need to take because it can run. You can learn more about why you received this status by going to the LinkedIn help site.

Step 8: Monitor Your Ads

With any marketing tactic, it’s important to analyze and report what’s happening once the campaign is launched. There are a lot of moving factors within LinkedIn Ads Manager so it may take some trial and error for you to find the sweet spot in LinkedIn campaigns. 

If you aren’t immediately seeing the results you hope for, try adjusting your audience size. It’s possible it’s either too niche where not enough people are seeing it or it’s too broad where the correct people aren’t seeing your ad. 

Once a LinkedIn ad launches, you’re able to “chart” it to get more demographical information. This will help you further define who is interacting with your ad, what industry they’re in, where they’re located, and even the company they work for. 

Currently, LinkedIn ads’ best practices suggest that your cost per click should be below $6 and your click-through rate should sit around .4%. These results can vary depending on your industry as well as the campaign objective you selected. 

For example, if your campaign objective is video views, LinkedIn isn’t showing your ad to users that are likely to click through to your landing page, hence lowering your click-through rate. 

As we finish up our LinkedIn Ads Guide, it’s okay if you haven’t mastered the platform. But you should feel confident in starting your first LinkedIn campaign. And if you’re thinking: “I want to do this, but I don’t have time,” well, that’s why we’re here.

Ready to experience the benefits of LinkedIn advertising? This LinkedIn Ads Guide is only the beginning. Speak with our social media team to learn about your possibilities.